
Ice suncatchers are natural material art pieces created by harnessing winter’s cold, and they’re gaining attention for transforming gardens and balconies into miniature galleries. Simply freeze water with flowers, berries, beads, and other items, then hold them up to sunlight to reveal sparkling light and color through the ice.
Since no special tools are required, they’re perfect for winter play with children. This article provides a detailed, beginner-friendly explanation of ice suncatchers’ appeal, how to enjoy them, foolproof creation methods, and safety tips.
Table of Contents
Turn Your Winter Garden into an Art Gallery! What Are “Ice Suncatchers”?
As winter’s chill intensifies, vibrant colors disappear from gardens and balconies, leaving the landscape feeling somewhat desolate. It’s a season when we’re tempted to stay indoors, avoiding the cold outside. However, this very coldness enables a beautiful art form woven from nature and ice: “Ice Suncatchers” (also called Ice Ornaments).
The creation process is remarkably simple. Just place water and natural materials in a container and freeze. Yet when bathed in sunlight, the sparkling result resembles precious jewels in its ethereal beauty. No special tools or difficult techniques are required. All you need is a bit of curiosity and winter’s cold air. Beyond being merely a craft activity, this offers a “special winter experience” that nurtures scientific learning, environmental education, and artistic sensibility—perfect for trying this weekend.
Popular Overseas! The Appeal of “Ice Ornaments” Preserving Natural Materials
In regions with long, harsh winters like Northern Europe and North America, these “Ice Ornaments” or “Ice Suncatchers” are beloved as standard winter activities that brighten the season.
Ice plates hung outside windows, shimmering through the low winter sun, uplift the spirit just by looking at them. They embody the Western concept of “Hygge” (cozy, comfortable time) and living in harmony with nature.
Recently gaining attention in Japan through social media, their charm lies primarily in the visual beauty of “preserving natural materials in ice.” Red nandina berries, green pine, golden dried leaves—plants suspended in transparent ice radiate a serene beauty as if time itself has stopped. Unlike plastic or glass decorations, their organic, warm glow transforms winter gardens into miniature galleries.
Virtually Free Materials? The Joy of Transforming Walk-Found “Treasures” into Art
For parents, the delightful aspect is that this activity is “ultimately eco-friendly and economical.” No expensive kits are necessary. Materials include nuts, leaves, and twigs found in parks and along walking paths—extensions of children’s favorite “acorn collecting” and “stone gathering” activities.
“Look! I found pretty red berries!”
“This leaf has an interesting shape!”
Roadside “treasures” that would normally be forgotten in pockets are reborn as one-of-a-kind art pieces when preserved in ice. Using household containers or food trays as molds means the cost is essentially zero.
The experience that “you can create something this wonderful with just ingenuity and nature’s bounty, without spending money” offers children an excellent opportunity to rediscover the value of things.
Beautiful Because It Melts Away: Enjoying the “Limited-Time” Nature of Impermanence
Ice suncatchers have a crucial difference from store-bought decorations: “they always melt away.” When temperatures rise, they return to water, and the plants inside fall to the ground and return to soil. While some children may feel sad that their hard work has been destroyed, this is the essence of this activity.
“When it gets warm, it returns to water and becomes nutrition for the plants.”
“It’s special magic that only lasts during winter.”
By conveying this, children can learn through direct experience about seasonal transitions, the Buddhist concept of impermanence (that all things eventually pass), and nature’s cycle (sustainability). Because it doesn’t last forever, the shining moment becomes all the more precious. Why not share this emotional experience with your child?
Educational Benefits: Learning Through Play! The “STEAM” Elements Nurtured by Ice Art
It would be a waste to stop at “it’s beautiful”—creating ice suncatchers is a treasure trove of learning. This small piece of ice contains elements of “STEAM education”, which integrates learning across Science, Technology, Engineering, Art, and Mathematics.
【Science】Why Does Water Freeze? Experimenting with Clear vs. White Ice
Water becoming ice—what seems ordinary to adults is magical wonder to children.
There’s no better teaching material for learning the basics of “phase change”: “water transforms into ice at 0°C (32°F).”
Let’s observe more closely. Compare ice made in your home freezer with ice slowly frozen outdoors.
“Why is the center of freezer ice white?”
“The ice made outside is clear—why is that?”
This relates to how air (bubbles) and impurities dissolved in water escape. Slow freezing allows air and impurities to be pushed out, creating higher transparency, while rapid freezing traps air, resulting in whiteness.
Observing while forming hypotheses like “Did the air have time to escape?” naturally cultivates scientific curiosity.
【Art】Design Sense Shines! Design Thinking in “Composition” and “Color”
Deciding how to arrange materials within the limited “circle” or “square” frame is a legitimate design lesson.
- Radial composition: Arrange from center outward (mandala pattern).
- Random composition: Scatter materials to create natural movement.
- Beauty of empty space: Don’t overcrowd; leave transparent ice sections.
Color combinations (color schemes) are also important. “Red berries stand out on green leaves (complementary colors)” or “Let’s gather only yellow petals (analogous colors)”—such prompts develop color sense. The trial-and-error process of “Where should I place things for the best appearance?” greatly stimulates children’s aesthetic sense and creativity.
【Nature】What Kind of Berry Is This? Enjoying “Winter Nature Hunts” with Field Guides
Material gathering becomes a “nature observation session.” “What’s the name of this red berry?” “This leaf has jagged edges”—bring collected plants home and research their names using field guides or smartphone lens search features.
What was simply called “a leaf” becomes recognized as a “living thing” with a name. This also leads to ecological awareness, like “Plants bearing fruit in winter—is it for birds to eat?” Familiar parks transform into learning fields.
Preparation: Kitchen Containers Work! Choosing “Molds” and “Water” for Success
When you’re ready to create, no special tools need purchasing. Items from kitchen drawers or recycling bins make excellent “molds.” However, there are some selection tricks.
From Cake Pans to Plastic Containers! Choosing “Molds” for Easy Release
After making ice, the most challenging task is “removing it from the mold.” Forcing out solidly frozen ice and breaking it ruins everything. Here are the conditions for easy-release containers.
Silicone Molds (Recommended: ★★★)
Baking silicone cups and cake molds are best. Being flexible, they peel cleanly with a simple bottom push. Complex shapes also succeed easily with silicone.
Plastic Storage Containers (Recommended: ★★☆)
Tupperware, empty yogurt containers, tofu packages, etc. They release easily with a bit of water, but hard plastic can crack if twisted forcefully, so be careful.
Metal Molds (Recommended: ★★☆)
Madeleine pans, tart pans, etc. Good heat conductivity means dipping in lukewarm water instantly melts the surface for release.
Paper Cups/Milk Cartons (Recommended: ★☆☆)
Convenient disposables, but paper can absorb water and stick to ice, making removal difficult. If using, choose ones with waterproof coating inside.
Select containers with wide openings that taper slightly toward the bottom for easier ice removal.
Aiming for Crystal-Like Clarity? The Secret of “Boiled Water” and “Distilled Water”
While you can simply pour tap water and freeze, why not aim for glass-like transparency? Here are extra steps to increase clarity.
Use Once-Boiled Water (Cooled Boiled Water)
Tap water contains dissolved air. Boiling once drives out the air (degassing). Using cooled boiled water creates clearer ice with fewer bubbles.
Use Distilled Water (Purified Water)
For those wanting to go further, try “purified water” sold at pharmacies or contact lens stores. With minimal impurities like minerals, it creates remarkably transparent results.
It’s fun to prepare both “tap water” and “boiled water” for a comparison experiment with your child to see the finished difference.
What About the Hanging “String”? How to Create Loops Before Freezing
This is the biggest challenge and crucial point. Drilling holes after ice formation is extremely difficult (requiring a drill!). The string must be set “before freezing.”
Simply inserting string results in it sinking or floating unpredictably. Place chopsticks or small branches across the container’s top, thread the string loop through, and suspend the knot portion in the water’s center. Taping the string to the chopsticks prevents shifting.
Also, making large knots or embedding the string in a “U-shape” in the water prevents the string from slipping out when ice begins melting.
Practice: More Than Just Freezing? The “Two-Stage Freezing Method” for Professional-Level Beauty
If you just add materials and water, then pop it in the freezer… light materials (petals, leaves) all float to the water’s surface, creating a work biased toward the ice’s “back side.”
Here are techniques for professional-looking results with materials trapped in the ice’s center.
Solving the Floating Materials Problem! What Is “Layering” Technique?
Instead of freezing all at once, freeze “in two stages.” Fill the container halfway to one-third with water. Don’t add materials yet (or only add heavy berries). Freeze this first.
Arrange main leaves and flowers on the frozen ice. Being on an ice stage, they won’t sink or float excessively, allowing placement exactly where desired. Then gently pour cold water over them. Add enough to submerge materials, then freeze again.
This creates works where materials appear floating in the ice’s center, with dimensional depth. Though slightly more effort, the beauty of the result is incomparably better.
Expel Air Bubbles! Tips on Water “Temperature” and “Stillness” When Pouring
Caution is also needed when pouring water. Pouring vigorously from the faucet entraps air with the flow, causing bubbles.
When pouring, trickle slowly along the cup’s edge. Banging doors open and closed or shaking the container during freezing disrupts crystal structure, causing whiteness. Place gently.
Freezer or Outdoors? The Best “Ice Growing Method” According to Temperature
Where you freeze also affects the result.
Outdoors (Below-Freezing Night) [Recommended]
If temperatures drop to 23°F (-5°C) or below on cold nights, definitely leave them on the balcony or in the garden. Because temperature drops more slowly than in freezers, impurities are pushed out more easily, growing beautifully transparent ice. Truly “natural ice.”
Freezer: [Quick]
For guaranteed freezing or insufficient temperatures, use the freezer. However, rapid freezing tends to whiten the center. For increased transparency, wrap the container in a towel or place in a styrofoam box before putting in the freezer to slow cooling speed, improving transparency.
Design Applications: Unleashing Children’s Creativity with “Mandalas” and “Wreaths”
After mastering basics, explore design variations. Arrangement alone creates artistic works.
A Microcosm Spreading from the Center! Arranging “Mandala Patterns” with Natural Materials
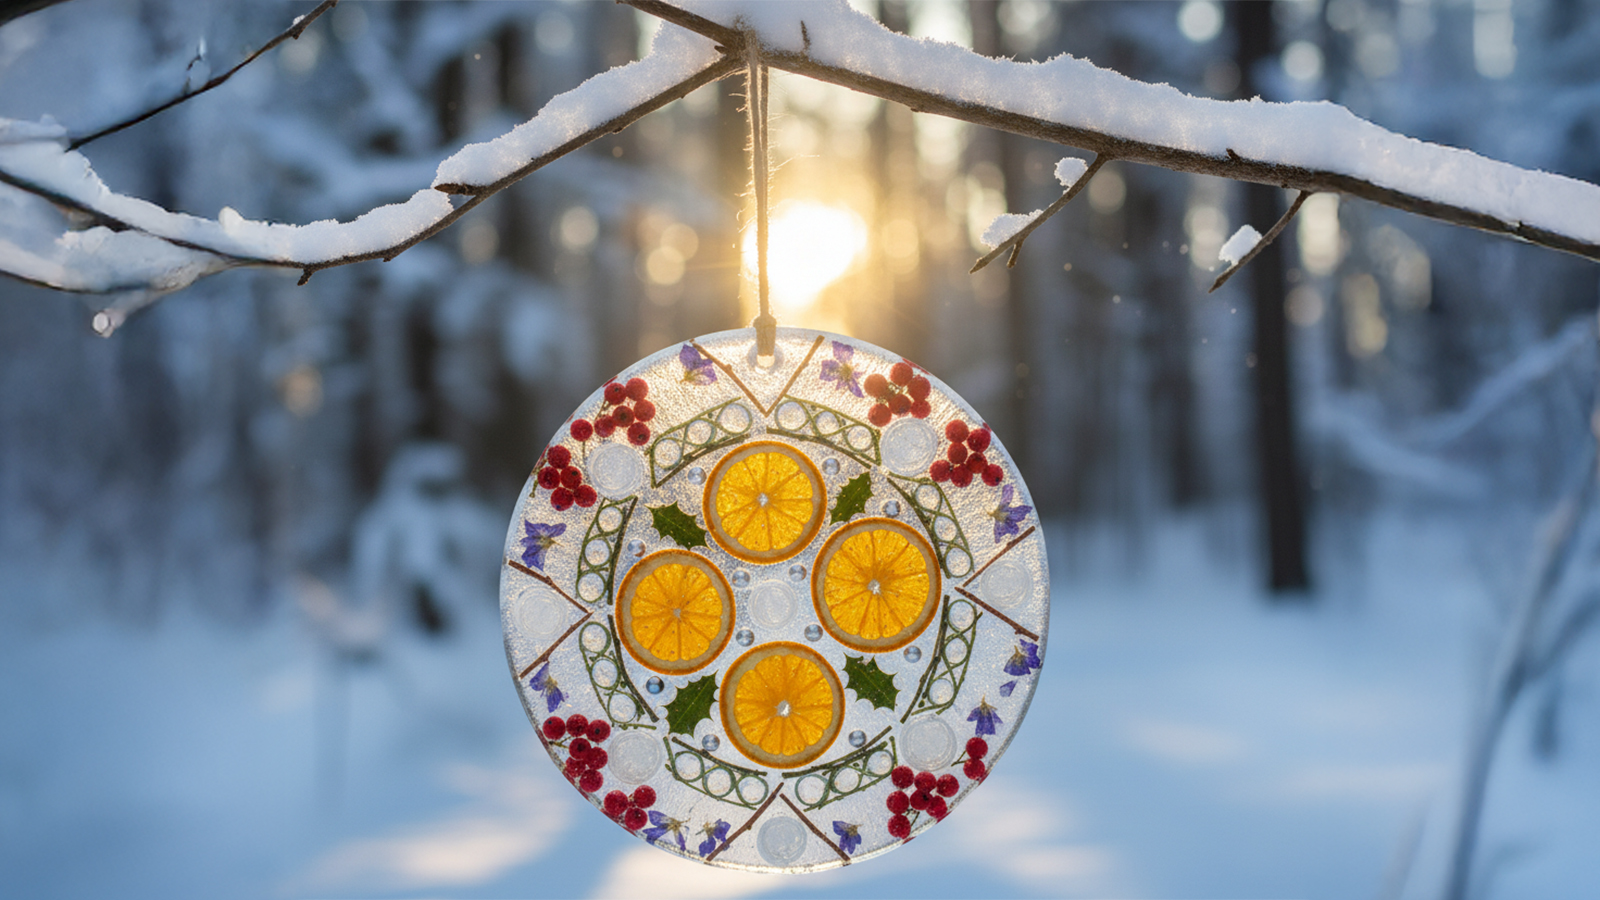
“Mandalas” are circular patterns radiating from the center. Natural flowers and snowflakes share this form. Place one prominent berry in a circular container’s center, arrange petals around it, then leaves around those—expanding systematically outward.
The arranging process, with prompts like “Which leaf next?” and “Let’s arrange them all around,” enhances children’s concentration and provides adults with healing time.
Making an “Ice Wreath” with Donut Shapes! The Trick for Leaving the Center Hollow
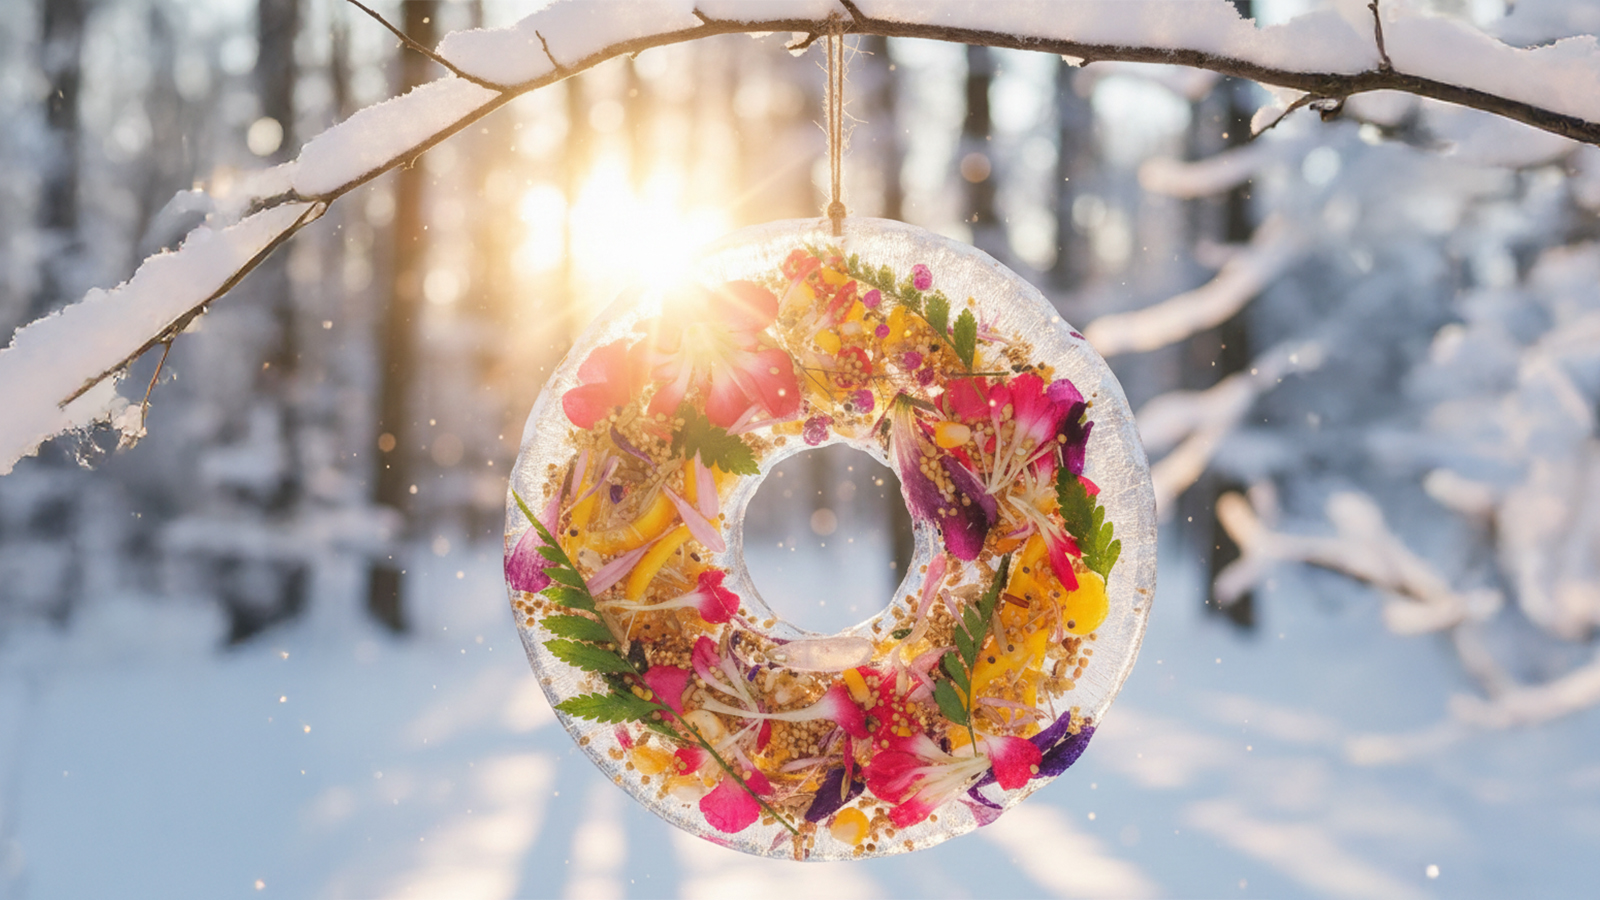
Want to create a wreath with a hollow center but don’t have a bundt pan (donut-shaped mold)? You can substitute with a regular round container.
- Place a plastic cup filled with weights (stones or water) in a round container’s center.
- Add materials and water in the gap between container and cup.
- After freezing, pour hot water into the center cup to remove just the cup, completing a beautiful donut-shaped ice.
This shape eliminates the need to pre-install loops for string, as you can simply thread ribbon through the hole afterward—much easier.
Colored Water Experiments! Arranging “Colorful Ice” Using Food Coloring or Paint
Natural colors are lovely, but coloring the water itself with food coloring is also fun experimentation.
Create pale blue water for “snow queen ice,” or mix yellow and red colored water to make orange.
Using the earlier “layering” technique, you can create dreamlike gradient ice: layer 1 clear, layer 2 blue, layer 3 red… The overlapping colors when held to light are breathtaking.
Display: Shining in Winter Sunlight! The Best “Exhibition Locations” and Hanging Methods
Once complete, it’s time to display. Where you hang them multiplies the suncatcher’s appeal.
Calculate the Sun’s Path! Finding the “Backlit” Position for Maximum Sparkle
As the name “suncatcher” suggests, catching (catching) the sun (sun) is the main purpose. Look around your home for places where “sunlight hits from behind (backlit)” during morning or daytime. Light won’t shine through if against a wall. Locations where they appear floating in air are best.
On the east side where morning sun rises, enjoy sparkling scenes during breakfast, while the west side offers dramatic golden-glowing ice bathed in orange sunset light.
No Trees? No Problem! Display Techniques Using Balconies and Eaves
Apartment dwellers thinking “I don’t have garden trees” shouldn’t give up.
- Clothesline: Hang using S-hooks on the unused end when laundry isn’t hanging.
- Railings or fences: Secure with zip ties or string.
- Planter hangers: Use wall-mounted hooks to display on balcony walls.
Hanging with the sky as background emphasizes ice transparency.
Safe Places for Falling! Safety Measures Anticipating “Drops” When Temperature Rises
Finally, safety management is most important. Ice suncatchers are quite heavy (1 liter water = about 2.2 lbs!). And when temperature rises, strings slip out, causing sudden “thud!” drops.
- Avoid areas where people walk
- Avoid above breakables
- Hang relatively low
To ensure safety even if they fall, hang at children’s eye level or on low branches near ground plantings.
Photography: Capturing Fleeting Beauty Before It Melts! Tips for Taking Instagram-Worthy Photos with Your Smartphone
Ice art has a fleeting life. Preserve beautiful photos before it melts.
Making the Subject Stand Out with Background Blur! Portrait Mode Techniques
Use your smartphone camera’s “Portrait Mode.” Focus on the ice and blur the background (distant trees or snowy landscape) to make plants inside the ice stand out crisply for professional-looking photos.
Cluttered backgrounds bury the ice’s transparency, so choose simple backgrounds (sky, snow, solid-colored walls).
Close-Up Discoveries! “Macro Photography” of Bubbles and Plant Fibers Inside Ice
“Macro photography” (close-up shots) taken from very close is also recommended. Tiny bubbles trapped in ice look like champagne bubbles, or plant leaf veins appear magnified.
Discover microscopic beauty invisible to the naked eye.
The Melting Process Is Also Art! Recording “Ice’s Lifespan” with Time-Lapse
From when morning sun hits until it drips away, revealing the plants inside, to when only string remains—record these few hours using your smartphone’s “time-lapse” feature.
Hours of change condensed into seconds of video, showing ice transforming like a living creature, is spectacular. It becomes a story-driven video work conveying “all things eventually disappear.”
Summary
How was your journey into the magical world of “ice suncatchers,” an activity that celebrates winter’s cold? Even if the ice isn’t perfectly transparent, even if the string slips out partway—these aren’t failures. The time spent discussing “Why did it turn white?” and “Let’s try the string this way next time” as parent and child, warming cold fingertips together—that time is the greatest treasure.
Gazing at completed ice and sharing smiles saying “It’s beautiful.” Then witnessing its return to soil as spring arrives. Such unhurried dialogue with nature reminds us of richness easily forgotten in busy daily life.