


Paper cup toys are easy to turn into sound play, stacking play, or pretend play, making them a familiar homemade option for indoor play with babies and toddlers up to age 3, and older toddlers can take part in the craft steps themselves.
On a stretch of rainy days, when you don’t have the energy to go outside, or don’t have time to run out to the 100-yen shop for more supplies, being able to put together something your child can enjoy using just the paper cups already at home can be enough, on its own, to make things feel a little lighter.
That said, while paper cup crafts look simple, using them with children up to age 3 means paying attention to things like cut edges, small decorations, whatever material goes inside, string, and rubber bands. What matters isn’t producing a polished finished piece, but shaping the activity into something your child can play with safely, in a way that matches their age and stage of development.
This article introduces 10 paper cup toys, along with age-specific ways to get involved from a baby’s first year through age 3. To make it usable both at home and in childcare settings, it breaks things down concretely into what the child can do, what an adult should prepare, and safety checks.
Table of Contents
Are Paper Cup Toys a Good Fit for Indoor Play With Ages 0-3?

Paper cups are light and easy to use for stacking, rattling, and pretend-play. That said, cut edges, small parts, and damage all need attention.
Paper cup toys are simple homemade toys for babies and young children, made by cutting, gluing, stacking, shaking, or rolling paper cups. They’re easy to start without any special tools, and part of the appeal is that you can make them from paper cups you already have at home, or materials that are easy to find at a 100-yen shop.
For play at ages 0 to 3, an expensive toy built to last isn’t the only right answer. A material that’s light, easy to remake if it breaks, and lets a child feel the change when they touch it themselves can sometimes suit that day’s play better.
At the same time, ages 0 to 3 are also a stage when children use things in ways adults don’t expect—putting them in their mouth, biting, pulling, throwing, stepping on them. Japan’s Consumer Affairs Agency has warned about accidents where children swallow small items such as toys and their parts, explaining that a child’s mouth is approximately 4 cm in diameter, and that anything smaller than that can potentially cause choking or swallowing accidents. For paper cup toys too, care is needed to keep small decorations or any material placed inside from coming loose.
(参照:Vol.544 Watch Out for Accidents Where Children Swallow Small Items Like Toys!—Consumer Affairs Agency)
Government Public Relations Online similarly explains that a 3-year-old’s mouth is about 4 cm in diameter—roughly the size of a toilet-paper-roll core. That said, this doesn’t mean “if it doesn’t fit through, it’s safe.” For paper cup crafts aimed at ages 0 to 3, it’s worth checking not just size, but also how easily a piece comes loose, how hard or sharp it is, and how easily it breaks.
(参照:Protecting Babies and Children From Choking and Swallowing Accidents—What to Do If It Happens—Government Public Relations Online)
Four Kinds of Play You Can Make With Paper Cups
Broadly speaking, paper cup toys can be developed into four kinds of play: sound play, stacking play, water play, and pretend play. It’s easier to bring these into your routine if you choose based on how your child can engage, rather than how polished the finished craft looks.
| Type of Play | What You Can Do With Paper Cups | Rough Age Guide | Example Toys |
|---|---|---|---|
| Sound play | Shaking, tapping, carrying your voice | Ages 0-3 | Shaker, paper cup phone |
| Stacking play | Stacking, knocking down, lining up | Ages 0-3 | Paper cup tower, paper cup bowling |
| Water play | Filling with water, scooping, pouring | Ages 1-3 | Paper cup shower |
| Pretend play | Imagining, handing over, exchanging | Ages 2-3 | Ice cream shop, animal figures |
For babies under 1 and around age 1, the focus is more on looking, listening, and touching than on “making” anything. By age 2, many children can more easily join in part of the craft process—things like adding stickers, choosing colors, or stacking cups. By age 3, it often becomes easier to extend play into pretend scenarios and simple rule-based games, like an ice cream shop, animal figures, or bowling.
Safety Points Worth Checking First
Checking your materials and method before making a paper cup toy makes it easier to catch damage or choking risks that could come up while your child is playing.
| What to Check | What to Look For |
|---|---|
| Are you using any small parts? | Avoid beads, beans, small stickers, and decorations that come off easily, depending on your child’s age. |
| Can anything inside come out? | For things like a shaker, close the opening securely, and check for damage before and after play. |
| Are any cut edges sharp? | Cover cut edges with tape, or have an adult do the cutting. |
| Is any string too long? | Keep it short enough that it can’t wrap around a neck or limbs, and use it only with adult supervision. |
| Could a rubber band come loose? | For things like the rocket toy, have an adult secure it, and don’t use rubber bands that have worn out. |
| Has it gotten wet and weakened? | As a rule, don’t reuse paper cups after water play, and discard any that tear. |
A few of the ten ideas further down this article—the ones that involve string, rubber bands, or a ball—are better suited to the older end of this age range and call for closer adult supervision no matter the child’s age; each one is flagged individually below. Starting December 25, 2025, commercially sold toys for children under 3 in Japan have also been subject to updated safety-labeling rules, including a “Kodomo PSC Mark” system covering age range and usage warnings. Homemade toys like these aren’t part of that system, but the same basic questions—age-appropriateness, usage precautions, small parts—are worth carrying over to what you make at home.
(参照:A New Regulation Has Been Introduced for Infant and Toddler Toys—METI)
(参照:Always Check This When Choosing a Toy for a Baby or Toddler! What to Know About the “Kodomo PSC Mark”—Government Public Relations Online)
Editor’s Note
The value of a handmade toy isn’t only in finishing it neatly. Stacking paper cups, knocking them over, making them rattle, crushing one a little by accident—those unplanned changes are an important part of how babies and toddlers explore the world.
There’s no need to compare your results with the polished crafts you see on Pinterest or Instagram and feel like yours falls short. What matters far more in play at this age isn’t a parent or caregiver producing a perfect piece, but noticing what caught the child’s attention that day.
Which Paper Cup Toy Works Best at Each Age?

In the first year, looking and listening come first. Around age 1, touching and knocking things down. Around age 2, sticking things on and stacking. Around age 3, it’s easier to extend play into pretend scenarios.
When choosing a paper cup toy, you’re less likely to run into trouble if you think in terms of “how can my child engage with this right now” rather than “what age can they start making this.” Even with the same paper cup shaker, during the first year it’s about listening to the sound an adult makes; around age 1, shaking it themselves; around age 2, a craft where they stick on stickers to decorate it; and around age 3, a prop for pretend music play.
Japan’s Nursery School Childcare Guidelines, published by the Ministry of Health, Labour and Welfare, call for shaping a childcare environment where children can engage on their own initiative and with enthusiasm, providing comprehensive care through daily life and play. It’s more natural to treat paper cup crafts the same way—as play that lets a child enjoy touching something familiar, along with its sound, shape, and back-and-forth—rather than framing it primarily around a specific learning outcome.
(参照:Nursery School Childcare Guidelines—Ministry of Health, Labour and Welfare)
| Age | How the Child Can Participate | Recommended Paper Cup Toys | Adult’s Role |
|---|---|---|---|
| Under 1 year | Looking, listening, touching | Shaker, tower | An adult makes the toy and stays close by to watch at all times. |
| 1 year | Shaking, knocking down, putting things in and taking them out | Shaker, tower, shower | Check for fragility and choking risk. |
| 2 years | Sticking things on, choosing, stacking, starting pretend play | Ice cream shop, color matching, bowling | An adult handles any cutting or hole-punching. |
| 3 years | Pretend play, enjoying simple rules | Kendama-style toy, rocket, phone, animal figures | Go over the play rules together. |
For Babies Under 1 and Around Age 1: Watching, Listening, and Early Stacking Play
For a baby under 1, it helps not to expect too much crafting from the child themselves. It’s enough for an adult to shake a paper cup shaker slowly, stack paper cups to show them, or knock them over gently so the child can enjoy the sound and motion.
At this stage, it’s also natural for a child to bring a paper cup to their mouth. Plan around that: don’t attach decorations, don’t use small materials, and replace the cup right away if it tears.
Around age 1, children tend to take an interest in knocking down what’s been stacked, putting things into containers, taking them out, and rolling things. A paper cup tower takes little effort to make and can be repeated over and over, which makes it an easy activity to use both at home and in childcare.
There’s no need to feel frustrated that “I just stacked those and now they’re knocked down.” For a 1-year-old, the sound and the change of things falling over is the play itself. An adult stacks, the child knocks it down, the adult stacks again—the enjoyment of back-and-forth lives in that repetition.
For 2-Year-Olds: Decorating and Taking Part in Simple Steps
For crafts with a 2-year-old, it works better to let them join in on part of the process rather than handing over the whole thing through to completion. Sticking stickers on a paper cup, choosing a color, stacking the cups, lining up the finished toys—even that level of participation can give a child the feeling that “I made this myself.”
A related TamagoDaruma article also covers the kinds of activities 2-year-olds tend to enjoy, including fine-motor play with the fingers and play that involves stacking things up or taking them apart. If you’re adapting paper cup crafts for a 2-year-old, leaning toward decorating with stickers, stacking, and pretend play makes it easier to bring in.


For 3-Year-Olds: Branching Into Pretend Play and Simple Rule Games
By age 3, many children increasingly use paper cups to stand in for ice cream, a phone, animals, or bowling pins. Simple rules also become easier to enjoy, like in paper cup bowling: lining cups up, rolling something at them, and seeing how many fall.
Even so, safety checks are still needed at age 3. Rubber bands, string, small decorations, and torn cups in particular are worth an adult checking before and after play.
10 Paper Cup Toys to Make: Sound, Stacking, Water, and Pretend Play
There’s no need to make all 10. Picking just one that fits your child’s age and the kind of play you want to do right now is easier to keep up.
Paper cup toys can go a long way even with just a few materials, simply by changing how you play with them. Here are 10 that are easy to bring into both homes and childcare settings for ages 0 to 3.
| Toy | Age Guide | Play Goal | What the Child Can Do | What an Adult Handles | Watch For |
|---|---|---|---|---|---|
| Paper cup shaker | Ages 0-3 | Listening to and making sound | Shaking, decorating | Filling and sealing it | Keeping the contents from coming out |
| Paper cup tower | Ages 0-3 | Stacking and knocking down | Stacking, knocking over | Preparing enough cups | Replacing any that tear |
| Kendama-style paper cup toy | Ages 3+ | Hand-eye coordination | Holding it, trying to catch the ball | Securing the string and ball | Handling the string and ball carefully |
| Paper cup rocket | Ages 3+ | Playing with a simple mechanism | Decorating, launching it | Cutting the slit, securing the rubber band | Never aim it at a face |
| Paper cup phone | Ages 3+ | Voice and conversation play | Talking, listening | Punching holes, threading the string | Keeping the string from being too long |
| Paper cup ice cream shop | Ages 2-3 | Pretend play | Choosing, handing over | Making the “ice cream” part | Avoiding small decorations |
| Paper cup shower | Ages 1-3 | Water play | Filling it with water | Punching the holes | Always supervise during water play |
| Paper cup animal figure | Ages 2-3 | Pretend/imaginative play | Sticking on the face, moving it around | Preparing small parts | Avoiding decorations that come off easily |
| Paper cup color-matching game | Ages 2-3 | Color and sorting | Choosing and matching colors | Attaching the colored paper | Not letting pieces become small parts |
| Paper cup bowling | Ages 2-3 | Physical movement | Lining up the cups, rolling the ball | Setting up the space | Using something soft to roll |
1. Paper Cup Shaker

A paper cup shaker is made by putting a sound-making material inside one paper cup and capping it with another. During the first year, an adult shakes it for the child to listen to; from around age 1 onward, the child can shake it themselves and enjoy how the sound changes.
To make it, put a small amount of a sound-making material into a paper cup, stack another cup on top, and firmly secure the join with wide tape. For a 2-year-old, you could let them take on the step of sticking large stickers on the outside.
The key precaution is making sure the contents can’t come out. Rice, beans, beads, and bells can all pose a choking risk if they escape. For ages 0 to 3, if you’re at all worried, it’s safer to skip the filling altogether and turn it into sound play based on tapping or shaking an empty cup instead.
2. Paper Cup Tower

A paper cup tower is a simple activity: stack the cups, knock them down, and stack them again. It is more of an open-ended stacking activity than a craft, similar to building blocks.
During the first year, the child watches an adult stack them; around age 1, they knock them down; around age 2, they stack them on their own; around age 3, it can become a simple challenge—”how many can you stack?” Adding more cups makes it an easy activity to bring into a childcare setting as well.
The precaution here is making sure no one slips by stepping on a cup. Set a play area, and clear away any cups scattered on the floor as you go.
3. Paper Cup-and-Ball Toy (Kendama-Style)

This toy is made by attaching a string to a paper cup with a lightweight ball on the other end, which the child tries to catch inside the cup—similar to kendama, a traditional Japanese cup-and-ball toy. Because it’s a hand-eye coordination game, it suits children age 3 and up.
The ball is easier to handle if you roll up newspaper or origami paper and tape it into a larger size—avoid making it too small. Keep the string on the shorter side, since a long one could wrap around the neck or limbs, and play only with adult supervision.
4. Paper Cup Rocket

A paper cup rocket uses two paper cups and a rubber band to create a mechanism that launches upward. It’s fun to look at and fun to watch move, and it’s a craft that tends to be popular from around age 3.
Because it involves a rubber band and cutting a slit, it’s safer for children ages 0 to 2 to just watch an adult show them the finished toy, rather than making it themselves. If you’re making one, have an adult cut the slit into the rim of the cup and secure the rubber band firmly. Leave the child in charge of drawing on the rocket or sticking on stickers.
Before playing, go over the rules together: never aim it at anyone’s face, don’t look directly over it right before launching, and don’t use a rubber band that’s worn out.
5. Paper Cup Phone
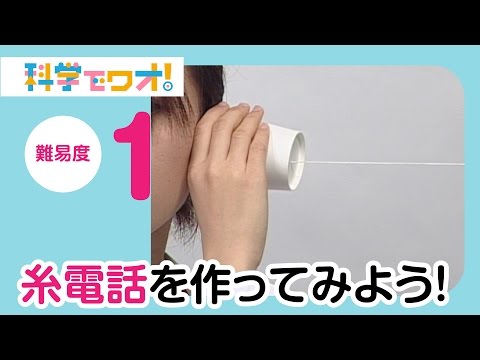
A paper cup phone is a classic toy that connects two paper cups with string to let children feel the vibration of their voice. From around age 3, it’s easier for it to develop into an exchange of talking, listening, and waiting for a turn.
Have an adult handle punching the holes and threading the string. A string that’s too long is more likely to get tangled, so at home it’s safer to start with a shorter length. In a childcare setting, decide on rules ahead of time—like playing seated, or taking turns—so that multiple children aren’t running around with it.
6. Paper Cup Ice Cream Shop

In this pretend-play game, a paper cup stands in for an ice cream cup, and balled-up origami paper or tissue paper becomes the “ice cream.” From around age 2, it can extend into exchanges like “here you go,” “thank you,” or “strawberry, please.”
As a craft for a 2-year-old, choosing the color of the “ice cream,” balling up the paper, and sticking on large stickers are all suitable steps. For ages 0 to 3, it’s safer to avoid small beads or fine decorations altogether.
It also works well as a summer-themed indoor activity, and part of the appeal is how naturally it leads to conversation—”that feels cold,” “what flavor do you want?”
7. Paper Cup Shower

For a paper cup shower, punch a few small holes in the bottom of a cup, then fill it with water so it streams out like a shower. It’s an activity to enjoy in the bath or during water play.
Have an adult punch the holes. Paper cups weaken once they get wet, so treat them as close to disposable. Even a small amount of water can pose a risk for young children, so an adult should stay right there watching the whole time, not just nearby.
Depending on the material, some paper cups hold up to water better than others. If you’re not sure, treat them as disposable after water play, and check the cups’ packaging for any relevant labeling.
8. Paper Cup Animal Figure

A paper cup animal figure is made by attaching ears and a face to a paper cup to represent a rabbit, cat, bear, or similar animal. It suits pretend play for ages 2 to 3.
For ages 0 to 1, it’s safer for an adult to draw the ears and eyes directly with a pen rather than sticking on small parts. From age 2 on, a child can join in with pieces that are less likely to come off—sticking on ears cut into a larger size, or adding eyes with big round stickers.
There’s no need to make the animal perfectly. If your child says “this is a cat,” that’s their version of it. Not pushing too hard toward an adult’s idea of the “correct” answer is also part of what lets the play open up.
9. Paper Cup Color-Matching Game

For this game, prepare paper cups with red, blue, yellow, and other colors of paper attached, and have the child match cards or balls of the same color to each cup. It suits sorting play for ages 2 to 3.
At home, it’s easier to follow if you start with just two colors. In a childcare setting, rather than preparing one set per child, offering it as a small-group corner activity makes it easier for children to settle in and engage.
If you’re using cards, make them large enough that they couldn’t fit in a child’s mouth—the same rough test mentioned above. For ages 0 to 1, it’s safer to use a larger piece of cloth or a large ball instead of cards.
10. Paper Cup Bowling

In paper cup bowling, you line up paper cups like bowling pins and roll a soft ball at them to knock them down. It suits indoor play for ages 2 to 3.
Drawing numbers or faces on the cups adds to the fun of knocking them down. That said, there’s no need to make too much of a competition over scoring. Around age 2, something like “it fell over!” is plenty; around age 3, “how many fell down?” works well.
Making it a rolling game rather than a throwing one makes it easier to do safely indoors. Pay attention to the flooring and nearby furniture, and clear away anything you wouldn’t want the ball to hit before you start.
If you want to see a wider range of paper cup craft ideas, an existing TamagoDaruma article can also help. This article focuses specifically on ages 0 to 3 and safety, so the other one is worth a look if you want to see more project examples.

Which Craft Steps Can a 2-Year-Old Handle on Their Own?
Rather than producing a finished piece, a 2-year-old can take part without being expected to finish the whole project—sticking things on, choosing, stacking.
Many parents and caregivers who search “crafts for a 2-year-old” aren’t actually looking only for instructions. What they’re likely trying to resolve is the uncertainty around how much to let the child do themselves, what to do if they lose interest partway through, and how to separate out the steps that could be dangerous.
Around age 2, the desire to “do it myself” grows stronger, even as things like scissors, hole-punching, precise gluing, and securing rubber bands are often still hard to manage. That’s exactly why it matters to design the activity around letting the child take on just part of it—not an adult doing everything and presenting a finished piece, and not leaving everything to the child either.
Editor’s Note
Crafting with a 2-year-old is less about the finished piece than about how they engage with it. Sticking on even just one sticker on a paper cup is “making something” to that child. What looks unfinished to an adult can already be a complete experience for the child.
Rather than a parent or caregiver finishing it neatly, what makes paper cup crafts worthwhile is being able to preserve the process itself—the child choosing, sticking things on, trying it their own way, losing interest for a bit, and coming back to it again.
Steps a 2-Year-Old Can Join In On Easily
What a 2-year-old can join in on most easily are steps that aren’t dangerous even if they go wrong, and that are easy to redo. It also matters that an adult doesn’t over-correct the parts the child has done.
| Step | Specific Example | Recommended Paper Cup Toy |
|---|---|---|
| Sticking on stickers | Sticking on large round stickers | Shaker, animal figure, rocket |
| Choosing colors | Choosing a favorite color of paper or cup | Ice cream shop, color matching |
| Stacking | Stacking paper cups on top of each other | Tower, bowling |
| Lining up | Lining them up side by side, as pins | Bowling |
| Handing over and receiving | “Here you go,” “thank you” | Ice cream shop, pretend play |
Steps Better Left to an Adult
For paper cup crafts with a 2-year-old, the following steps are safer left to an adult. Especially for ages 0 to 3, it’s safer not to overuse small googly-eye parts or beads just because “they look cute.”
| Step | Why |
|---|---|
| Making a cut with scissors | Hand movements can easily become unsteady |
| Punching holes with an awl or similar tool | The tip is sharp and dangerous |
| Stapling | The staple could come loose |
| Securing rubber bands | It could snap back and hit someone’s face if it comes loose |
| Adding small parts | It could lead to choking |
| Tying string | Length and tangling need to be managed |
What to Say When Things Don’t Go Smoothly
With a 2-year-old’s crafts, it’s common for the sticker to go on crooked, for them to lose interest partway through, crush the cup, or start a completely different game. When that happens, it helps more to put into words the part they did engage with, rather than pushing “let’s make it properly.”
- “You stuck it right there!”
- “It made a sound!”
- “It fell over!”
- “Let’s stop here for today.”
- “Let’s leave it out so we can play with it again later.”
What an adult thinks of as “the craft” and what a child experiences as “the play” aren’t the same thing. For a 2-year-old, the moment of touching it, the moment it made a sound, the moment it fell over—these are the bigger experiences, more than the process of reaching a finished product.
What Should You Check to Play Safely With Paper Cup Toys?
Checking a homemade toy three times—before making it, before playing, and after playing—makes it easier to catch damage or choking risks.
While paper cup toys are familiar and easy to handle, they don’t come with an age range or usage precautions printed on them the way store-bought toys do. That means it’s up to the adult to check whether it’s okay to use with this particular child right now.
In particular, things like the shaker’s contents, the animal figure’s ears, the color-matching cards, the rocket’s rubber band, and the phone’s string can come loose or wear out during play. For paper cup crafts, it’s easier to put this into practice by checking at the following three stages.
Checks Before Making It
Before making the toy, check your materials. Look at whether the paper cup has any tears or stains, whether it needs a cut made into it, whether whatever you’re putting inside is too small, whether the decorations come off easily, and—if you’re using string or a rubber band—whether it’s appropriate for your child’s age.
For ages 0 to 1, the basic safe design is simply not to use small parts at all. Even at 2 to 3, if a child still tends to put things in their mouth, it’s best to avoid beads or small beans.
Checks Before Playing
Before play, have an adult handle the finished toy once to check it over. Look at whether the shaker’s contents can escape, whether a cut edge on the cup catches on a finger, whether the tape has peeled up, whether a rubber band looks close to coming loose, and whether any string is too long.
A handmade toy can be fine right after you make it but weaken after a few rounds of play. Paper cups in particular are a material that deforms easily from being stepped on, getting wet, or being gripped hard.
Checks After Playing
After play, check for any broken parts. If a paper cup has torn, throw it away. For a cup that’s gotten wet, it’s generally safer to replace it with a new one than to dry it out and reuse it.
In a childcare setting, it’s also worth counting all the loose pieces before and after play. Keep track of anything that could come loose, especially the shaker’s contents, the color-matching cards, and the animal figure’s ears.
| Timing | Check Item |
|---|---|
| Before making | Not using any small parts |
| Before making | No tears or stains on the paper cup |
| Before making | Any cutting or hole-punching is done by an adult |
| Before playing | Contents can’t come out |
| Before playing | String or rubber bands aren’t close to coming loose |
| Before playing | No cut edges or sharp points |
| After playing | Check for tears, chips, or wet spots |
| After playing | Throw away anything broken rather than storing it |
Paper Cup Play at Home vs. in Childcare Settings
At home, it works well to make one toy together as parent and child. In childcare settings, it works better to reduce the number of steps so materials can be handed out to the whole group quickly.
Paper cup toys look the same whether you’re at home or in a childcare setting, but the thinking behind how you prepare them is actually different. At home, the process of a parent and child making one toy together is itself the play. In a childcare setting, you need to safely prepare enough for the whole group, get through the activity within the time available, and finish cleanup as well.
The Nursery School Childcare Guidelines call for arranging the childcare environment so that children can engage with it on their own, act on their own initiative, and build up a range of experiences. For paper cup crafts too, it matters to adjust the activity to the number of children, their development, the indoor environment, and staffing—rather than applying an activity plan exactly as written.
(参照:Nursery School Childcare Guidelines—Ministry of Health, Labour and Welfare)
How to Make It: For Home
At home, the biggest trick is not rushing to finish. With a paper cup shaker, it’s fine to just stick stickers on today and add the sound-making contents tomorrow.
Trying to get through every step on a day when you’re worn out just adds to the load. Choosing an activity with less to build in the first place—like a paper cup tower or bowling—is also a good approach.
| Good Fit for Home | Why |
|---|---|
| Few materials needed | Less preparation burden |
| Ready to play right away | Minimizes waiting before play begins |
| Easy to redo if it breaks | Reduces pressure to keep the finished toy perfect |
| Easy to clean up | Simple to put away or toss out after use |
There’s no need to brace yourself for a whole “craft session.” Just pulling out two or three leftover paper cups and stacking them is plenty of at-home play on its own.
How to Make It: For Childcare Settings
In a childcare setting, reducing the number of preparation steps matters. Rather than aiming for every child to reach the same level of finish, narrowing it down to “just one step the children take part in” makes for a more stable activity.
For example, in a class of 2-year-olds doing the paper cup ice cream shop, an adult can prepare the paper cups and balled-up colored paper in advance, and the children simply choose their favorite color and put it into the cup. Even just that is enough for it to work as pretend play.
| Preparation | Children’s Activity | Cleanup |
|---|---|---|
| An adult prepares one paper cup per child | Sticking on stickers, choosing, stacking | Count and collect them |
| Any dangerous steps are done in advance | Making sounds, knocking down, pretend play | Dispose of anything broken |
| Materials are divided into small portions | Small groups take turns using it | Check that no small parts are left behind |
When childcare staff are running a busy craft activity, what matters more than producing a photogenic finished piece is being able to hand materials out safely and clean them up safely. That’s not cutting corners—it’s a design that fits the practical realities of childcare work.
A Note for Sending It Home With Families
If a paper cup toy is going home from a childcare center with a family, it helps to include a short note of caution.
Sample Note to Send Home
Today, your child played with a handmade paper cup toy. Since it’s made of paper, please dispose of it if it tears or gets wet. Before each use, have an adult check that no small parts have come loose, and please continue to supervise play at home.
Having even this one note makes it easier to carry the same safety awareness from what’s made at the childcare center over into how it’s reused at home.
If you’d like to broaden your indoor play ideas overall, TamagoDaruma’s indoor play article can also help. Combining paper cup toys with physical play or group games widens the range of what you can do.


Frequently Asked Questions About Paper Cup Toys
Here are the points parents tend to wonder about before making paper cup toys—age, materials, safety, and how to use them in childcare.
- Q. At what age can a child start playing with paper cup toys?
- If an adult makes it and shows it to them, a baby can enjoy it from early in their first year. That said, since babies and young toddlers often put things in their mouths, avoid small parts, and always have an adult watching nearby.
- Q. What kind of paper cup play suits a baby under 1?
- Activities based on looking, listening, and touching suit a baby under 1 best—an adult shaking a paper cup shaker, stacking cups to show them, or knocking them over gently. There’s no need to have a baby this age do any of the crafting themselves.
- Q. How much can a 2-year-old do during crafts?
- Steps like sticking on stickers, choosing colors, stacking paper cups, and lining up finished toys suit a 2-year-old. Have an adult handle cutting, punching holes, securing rubber bands, and working with small parts.
- Q. What’s good to use for the inside of a paper cup shaker?
- Rice, beans, and similar materials are sometimes used to enjoy the difference in sound, but if they escape, they can pose a choking risk. Seal the cups together securely with sturdy tape so the contents can’t come out, check for damage before and after every round of play, and keep an eye on the toy while it’s in use. If you’re at all unsure, it’s safer to switch to sound play without any filling, or to tapping the paper cup instead.
- Q. Is it okay to use a stapler or rubber bands?
- If you do use them, have an adult secure them in a way that keeps the child from touching them directly. For ages 0 to 2, given the chance that a staple or rubber band could come loose, it’s best to replace them with tape or a different way of playing wherever possible.
- Q. What should you watch for when using paper cup toys at a childcare center?
- Before handing out materials for the whole group, check whether the steps fit the children’s age, whether there are any small parts, and whether you’ll be able to confirm the count during cleanup. In childcare, what matters isn’t just how easy something is to make, but also whether it can be handed out and collected safely.
- Q. Can a paper cup used for water play be reused?
- Paper cups weaken once they get wet and tear more easily. As a rule, it’s safer to dispose of any used for water play rather than reuse them. Also check the water-resistance and intended-use labeling on the cups you’re using.
- Q. What should I do if it keeps breaking quickly?
- It’s fine to accept quick breakage as simply a feature of paper cup play. Reinforce with tape anything you want to keep using longer, and discard anything that tears rather than continuing to play with it. Treating “knocking it down, crushing it, making it again” as part of the fun—for the pieces still in good shape—makes it easier for both parent and child to approach without pressure.
For children ages 0 to 3, paper cup toys serve as a small entry point into engaging with a material they already know. Rather than an adult building it to a polished finish, leave room for the child to touch and take part. Let an adult take on the steps that carry risk, and let the child take on the steps they can do safely. That balance is what makes a handmade toy easy to use both at home and in childcare.
The next time you make a paper cup toy, try picking just one from the age-based table. There’s no need to make a lot. If the child in front of you today enjoyed even one of these—shaking, stacking, knocking down, choosing, handing over—then the paper cup craft has already done its job.


