


Nano tape squishies have gained popularity primarily on international social media and are now captivating people of all ages, from children to adults, as the latest sensory play trend. By simply placing beads or stickers inside transparent, elastic nano tape and sealing it, you can create a delightfully squishy toy that’s beloved for its adorable appearance and satisfying texture.
The appeal lies in its accessibility—all you need are scissors and tape, making it perfect for first-time crafters. This article provides a comprehensive guide covering basic techniques, creative variations, and safety tips in a format that’s ready to use at home or in childcare settings.
Table of Contents
100 Million Views on Social Media!? The Truth Behind the Globally Viral “Nano Tape Squishy”

While scrolling through TikTok or YouTube Shorts, have you come across videos of people playing with transparent, jelly-like objects that resemble giant water droplets? This is the “nano tape squishy” that’s currently captivating not only children but adults worldwide.
Originally used for disaster prevention or storage purposes, this DIY toy is made by sticking together strong transparent double-sided tape (commonly known as nano tape or magic tape) and sealing air, slime, or water inside. The satisfying elasticity that comes through the screen and its sparkling visual appeal have sparked conversations, and the fact that this mysterious object seen “only on screen” can actually be easily made at home has made it a staple of parent-child “home crafts.”
Overflowing Transparency and Jelly-Like Texture! The Charm of This “Touchable Water Droplet” That Soothes Even Adults
The greatest appeal of this squishy lies undoubtedly in its overwhelming “transparency” and unforgettable “premium texture.” By filling thick nano tape with translucent blue or clear-colored slime, you can enjoy the surreal beauty of holding what appears to be a “giant water droplet” right in the palm of your hand.
When squeezed, it morphs and oozes between your fingers, then bounces back to its original shape when released—its lifelike movement creates an emotional attachment. Unlike commercially available memory foam squishies, because the contents are close to liquid, you can also feel the cool temperature and weight, which is another distinctive feature.
Additionally, when held up to light, the air bubbles inside sparkle brilliantly, making it perfect for Instagram photos. Drawing eyes and mouths or adding limbs to create characters doubles the cuteness factor, as seen in videos. For parents juggling housework, childcare, and work, this becomes the ultimate relaxation tool—mindlessly squeezing it to calm the mind. This mysterious gap between looking fragile yet being durable is precisely why it’s loved worldwide.
Materials Available at Dollar Stores! The Secret to Creating Premium Quality Without Breaking the Bank

You might think, “Don’t I need an expensive kit to make something this beautiful?” Rest assured, most materials can be purchased at dollar stores like Dollar Tree or Five Below.
The main material, “nano tape,” is sold in stationery or disaster supply sections under names like “heavy-duty double-sided tape” or “gecko tape,” with a thickness of 1-2mm being optimal. For the filling, simply choose highly transparent slime from the toy section.
The secret to achieving “premium quality” without spending much lies in how you handle the tape. Since fingerprints on the adhesive surface reduce transparency, using tweezers or slightly moistening your fingertips during work is the key to professional-grade results.
Additionally, when adding slime inside, be careful not to trap too much air, and press the tape edges together without gaps to create a durable, jewel-like transparent piece. The high cost-performance of creating magical toys with only familiar budget-friendly items is another delightful point for parents.
Why Do Kids Get Hooked? Its Ability as a Sensory Toy That Stimulates Vision and Touch Simultaneously
Nano tape squishies go beyond being merely trendy toys—they’re excellent “sensory toys” that promote children’s development. Sensory toys are playthings that stimulate the five senses to encourage brain development and emotional stability.
The unique suction-like texture of the tape and the squishy resistance when the internal slime deforms (tactile) send rich stimulation from children’s fingertips to their brains. Furthermore, the way the shape changes with each squeeze and sparkles by reflecting light (visual) enhances children’s concentration and stimulates curiosity.
For young children who can’t express emotions well through words, this type of sensory play is also effective as a means of stress relief and cooling down. Experimental elements like “What happens if I squeeze hard?” or “How far does it stretch?” also spark interest in physical properties—nurturing what’s known as “seeds of science.”
The fun of seeing something you made move like a living creature endlessly expands children’s inquisitive minds. It’s truly a treasure trove of educational value—an item that allows learning through play while fulfilling emotional needs.
Foolproof Material Selection! A Preparation Checklist for Creating That “Bouncy” Elasticity
To create the bouncy squishy popular in videos, material selection significantly affects the final result. Particularly, the nano tape used for the exterior varies in elasticity depending on thickness and adhesive strength, so choosing carefully from the start is crucial.
Additionally, what material you put inside changes the level of bounciness, allowing you to adjust to the texture children prefer. Furthermore, having pens for creating character limbs and faces, as well as decorative materials, prepared in advance makes crafting smoother. Here we introduce recommended materials that are easy to prepare at home and less prone to failure.
The Star is “Nano Tape”! How Thickness and Adhesive Strength Are Key to Success

Nano tape is essential for creating that distinctive bouncy elasticity. Particularly thick types have a strong rebound when squeezed, making it easier to reproduce that “squishy feeling.”
Thin types are soft and tend to lose shape easily, so for beginners, thick types around 2-3mm are easier to handle and recommended. Also, if the adhesive is too strong, it tends to stick to hands during work, while if too weak, gaps form when making pouches and leaks occur easily, so choosing a type that’s easy to stick together evenly provides peace of mind.
Using highly transparent nano tape makes the internal materials and colors visible beautifully, making character creation more enjoyable. By avoiding touching the adhesive surface too much before working, strength is maintained and durability after completion improves. When handling at home, having an adult support cutting prevents the tape from tangling in children’s hands and allows safe progress.
Should You Fill It with Water? Slime? The Best Material for Achieving Video-Like Texture
The “filling” material determines the squishy’s elasticity and how it wobbles. If you want to reproduce the bouncy texture seen in videos, a mixture of water and a small amount of laundry starch is easy to handle and features smooth surface movement.
Using only water makes it wobble softly but tears easily, so adding just a bit of thickness increases strength and makes it easier to handle. The method of adding slime is also popular, offering a more substantial feel, but too much makes it heavy, requiring pouch strength.
Mixing in a small amount of unused gel beads or cold pack contents adds a cooling sensation, allowing you to enjoy different stimulations. With any material, it’s important to seal the pouch edges tightly to prevent leaks. Filling about 80% stabilizes the shape and provides just the right elasticity when squeezed.
Characters Matter! Preparing Black Pens for Drawing Limbs and Expressions
To finish with an expressive character, how you draw the face and limbs is a crucial point. In initial squishy making, drawing directly on the nano tape with a black pen expresses hands and feet.
Choosing a smudge-resistant permanent marker makes lines clear and makes it easier to draw detailed expressions and poses. Even simply drawing limb shapes and finger movements while utilizing the transparency of nano tape makes the character stand out.
Furthermore, combining stickers or small decorative materials adds dimension to eyes and cheeks, making children more likely to form attachments. When attaching decorations, choose positions where they won’t peel off easily, and to prevent choking hazards, always have adults manage small parts during work.
With just nano tape and a pen, the range of expression expands depending on creativity. By freely drawing, creating original squishy characters becomes even more enjoyable.
【Practical Edition: Part 1】Basic Techniques for Making a “Slime Bomb” with Magic Tape
“Slime bomb” doesn’t mean anything dangerous. It’s a super fun squishy with a satisfying squishy texture. While it looks simple, creating a clean sphere actually requires a few tricks.
Carelessly sticking it together can result in contents bursting out during play, creating a disaster. But don’t worry. By carefully following the three steps introduced here, anyone can create a beautiful, bouncy “magic water droplet” that looks store-bought. Let’s proceed carefully through each process while experiencing the excitement of a science experiment with your child.
STEP 1: Tape Cutting and “Pocket Making” is Everything! Preliminary Work for Removing Air
- First, let’s build the foundation. Cut two squares of nano tape, approximately 5-7cm (adjust according to desired size). At this time, tape easily sticks to scissor blades, so slightly wetting the blade tips with water allows stress-free clean cutting.
- Next, stick the adhesive surfaces of the two tapes together, but here’s the first important point. Instead of closing all four sides, leave only one side at the top open and firmly press and seal the remaining three sides with your fingers. In other words, imagine creating a “pouch (pocket)” with tape.
- At this time, carefully press from the edges while being careful not to let excess air enter between the tapes. The secret to maintaining transparency without fingerprints is not peeling off the protective film yet, but peeling it after the pouch shape is formed. Creating a solid pocket is the first step toward a sturdy squishy that won’t leak.
STEP 2: The Art of Slime Insertion! Tips for Proper Amount and Placement to Prevent Leaks
- Once the pocket is ready, it’s time to add the contents. Clear slime with transparency or gel-like materials with viscosity are recommended here. Using a spoon or similar tool, carefully pour it through the opening you left earlier.
- Being greedy and stuffing it full is a no-go here. If there’s too much content, it will overflow when you seal it at the end, and moisture or oils will attach to the tape’s adhesive surface. Once dirt gets on the adhesive surface, it won’t stick anymore.
- The guideline is “half to 60% of the pocket.” Leaving some room allows the slime inside to move freely when squeezed, enabling you to enjoy that distinctive “squishy” deformation. Position the slime in the center and be extremely careful that it doesn’t touch the edges (margin parts) where you’ll be adhering.
STEP 3: This is the Most Challenging Part! The “Pressing” Technique Using Finger Temperature to Seal Without Gaps
- The final challenge is the sealing work. With the slime inside, close the opening at the top that you left. At this time, rather than simply pinching with fingers, the professional technique is to press using the pads of your fingers with the image of “warming while crushing.” Nano tape has the property of becoming slightly softer with body heat, increasing adhesive power and making it easier to blend.
- Once there are no gaps at all, cut off the four corners of the square pouch-shaped tape with scissors and shape it into a round form (or teardrop shape). If the cut edge is slightly sticky, gently trace that part with your finger to blend it.
- If the scissor marks are angular and bothersome, there’s a trick of briefly applying warm air from a hair dryer from a distance to smooth the surface, but be careful as overheating risks bursting. Now your transparent body is complete!
【Practical Edition: Part 2】Making a Simple Blob Cute! Adding Limbs to Breathe Life Into It
You’ve completed a bouncy body, but at this point it’s still just a “mysterious transparent blob.” From here, let’s add more touches to evolve it into a character that children can cherish like a friend.
The moment that inorganic squishy grows limbs and gets a face, it becomes not just a toy but a beloved “companion.” Particularly, adding long, thin limbs creates movement, making it strike comical poses when squeezed, multiplying the fun.
Here we’ll introduce the finishing process that transforms it into that humorous, lovable figure using familiar materials.
Draw on Nano Tape to Recreate! How to Make Those “Long, Thin Limbs” Seen in Videos
Those distinctive “lanky” limbs impressive in videos can be recreated by drawing directly on nano tape with a black pen. By utilizing transparent nano tape and expressing with lines only, you can achieve limbs with a light, mysterious atmosphere.
A smudge-resistant permanent marker is recommended for the black pen. First, draw thin, long lines on the nano tape surface to express arms and legs, and making the tips slightly round gives them a more “hand-like” or “foot-like” appearance. Even with simple shapes, just varying length and angle creates individual poses.
This drawing makes the limbs appear to stretch and contract when squeezing the squishy, or seem somewhat humanlike in gesture, creating expressions you won’t tire of watching. Drawing them slightly longer allows you to make them appear sitting or clinging to something, making photography enjoyable too.
The convenience of being able to do this with just nano tape and a pen is one of its charms. Draw and experiment freely to complete your own unique “long, thin limb” character.
Lovability Determined by Expression! A Workshop on Drawing “Faces” Using Permanent Markers or Stickers
Let’s draw the “face,” which could be called the character’s life force. Since the nano tape surface is smooth, “permanent markers” are essential for drawing tools. Water-based markers will immediately bead up and disappear.
Simply drawing round black eyes and adding a little mouth is cute enough, but adding highlights (sparkles) to the eyes with a white paint marker or correction pen instantly brings the expression to life.
For those worried “I’m not good at drawing and might fail,” using eyeball stickers sold at stationery stores or decorative stickers for nails is also a smart approach. As a finishing touch, adding cheek blush with a pink pen dramatically boosts lovability. Even if you make mistakes, you can wipe it off with nail polish remover or alcohol wipes and try again, so experiment with various expressions.
Connection Point Reinforcement Technique! One Extra Step to Keep Limbs from Falling Off Even with Vigorous Squeezing
It would be sad if, after making it so cute, the limbs fall off while your child is playing enthusiastically. That’s why reinforcing connection points is important.
When attaching the made limbs to the body, simply sticking them on isn’t strong enough. The trick is to place another small piece of transparent nano tape on top of the limb base area, covering it like a “band-aid.”
This integrates the limb parts with the body, preventing them from easily coming off even when squeezed hard or pulled. Just adding this one step dramatically improves durability, turning it into a favorite toy that lasts long. Anticipating that children will play vigorously, make sure to guard it well.
Making It Even More Fun! Collection of “Sensory Play” Ideas for Playing to the Fullest with Kids
Handmade squishies with their bouncy elasticity are plenty fun just by squeezing and crushing, but with a little creativity, they develop into activities that get parent and child excited together. Games competing to deform shapes or cooling them for seasonal sensory play create completely different experiences with the same squishy.
Additionally, shining light enhances transparency, changing how it looks to something fantastical, stimulating children’s curiosity. Here we introduce play methods that can be easily incorporated at home and enjoyed together by parent and child.
Squeeze, Crush, and Relieve Stress! The Fun of Parent-Child Deformation Contests
A play method using the squishy’s major appeal of “deforming and returning” is the deformation contest. Parents and children each squeeze or pinch their squishies with all their might, competing to see who can make the funniest shape.
The process itself of freely deforming—flattening and spreading, squeezing tight, leaving marks with fingers—is fun and naturally provides stress relief. Taking photos of deformed shapes and deciding the “Best Deformation Award of the Day” generates new play daily.
For toddlers, making it a “What does this look like?” game where adults deform shapes for guessing is also enjoyable. Because rules are minimal and freedom is high, it’s easy for siblings and friends to get excited too. Since there are many squeezing motions, it also becomes hand exercise and offers high satisfaction as sensory play.
Chill in the Refrigerator for Coolness! Summer-Friendly Use as a Cooldown Item
When lightly chilled in the refrigerator, squishies add instant coolness to the touch, making them excellent for summer cooldown play. When the filling uses water or viscous materials, temperature transfers easily, creating a refreshing sensation that brings smiles when children squeeze it.
The optimal chilling time is about 10-20 minutes; freezing makes it hard and loses elasticity, requiring caution. Using it after baths or outdoor play helps lower body temperature and is also effective as sensory play.
For children who dislike coldness, letting them touch it through a towel allows adjustment to how temperature is felt. It’s easily incorporated as summer-specific play, allowing parent and child to enjoy seasonal changes together.
Light It Up for Fantasy! “Glowing Droplet” Play Using Smartphone Light
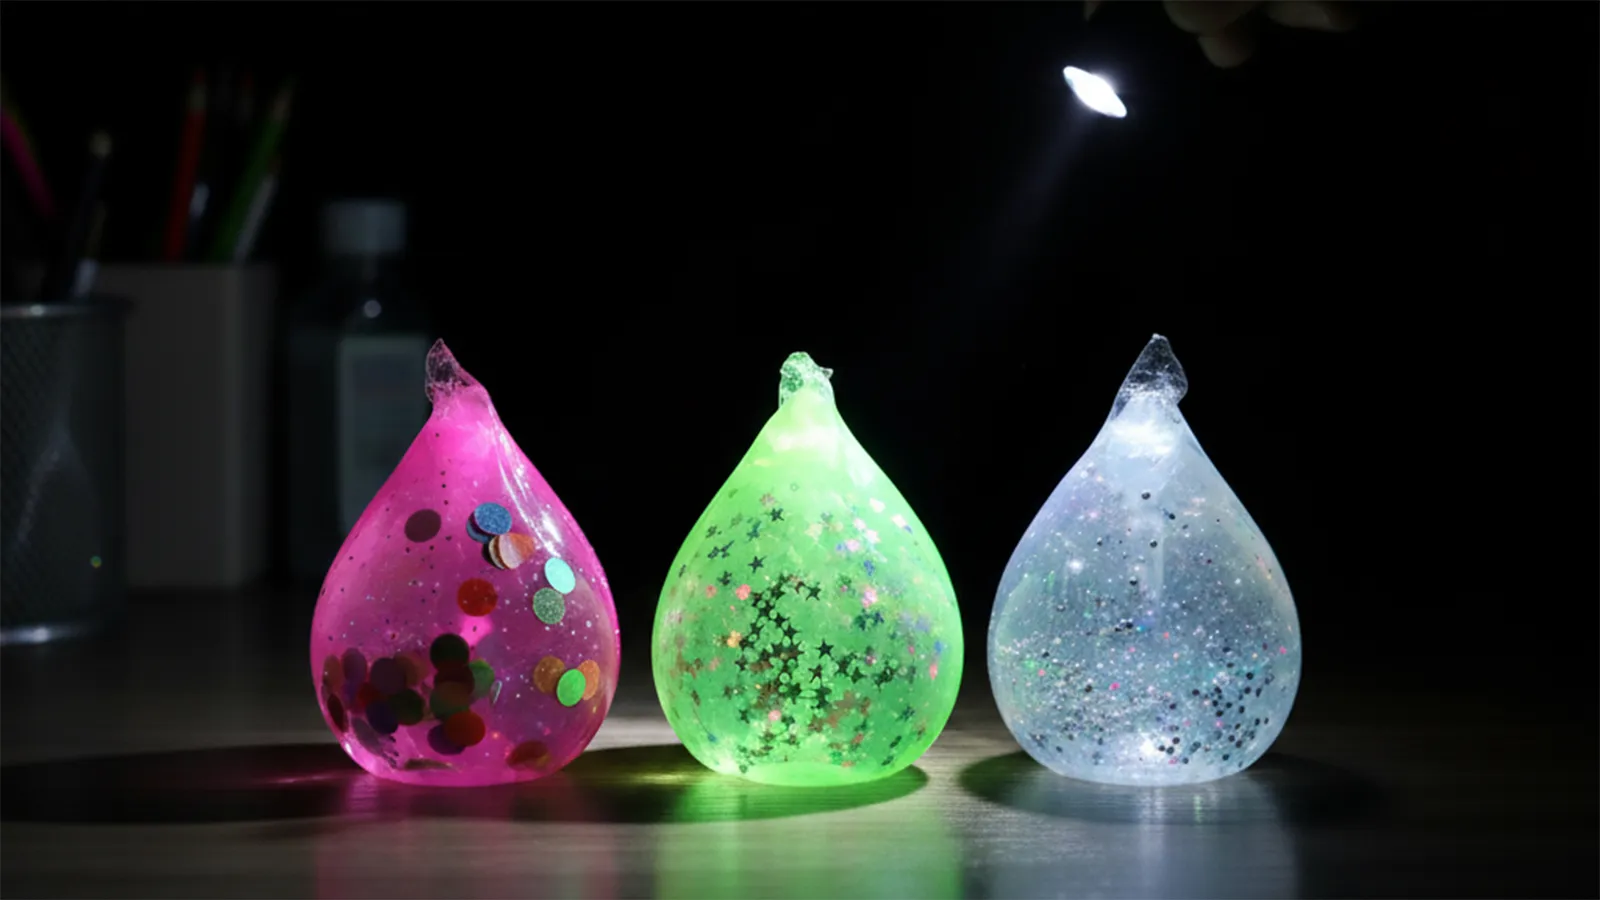

Squishies made with highly transparent nano tape look like “light droplets” when light passes through, making them perfect for light-up play. Shining a smartphone light from behind the squishy in a dark room creates a fantastical scene where the water or slime inside reflects and sparkles brilliantly, captivating children.
Changing the light angle varies how colors look and how it sways, allowing shadow puppet-like play or guessing “What shape do you see?” Drawing with invisible ink makes patterns emerge only when illuminated, enabling special production effects.
For safety, having adults hold the light while children gently move the squishy allows worry-free enjoyment. It’s also recommended play for nighttime relaxation.
Conclusion
Handmade squishies not only allow enjoyment of different textures through material choices and filling variations, but expanding play methods enriches parent-child time. Actions like squeezing and crushing stimulate children’s senses, and there are many home-specific enjoyment methods like deformation contests or light-based play.
Simply chilling in the refrigerator transforms it into seasonal play, generating new discoveries each time. Easy to make and providing long-lasting play, squishies are recommended as familiar playthings that nurture children’s creativity and curiosity. The greatest appeal is being able to play to the fullest while innovating together as parent and child.


")

