


 from a Single Sheet of Origami Paper! Tips for a Beautiful Finish Explained")
The “Pochi bag,” convenient for New Year’s money gifts or small tokens of appreciation, is a popular handmade item that can be easily created from a single sheet of origami paper. Rather than buying store-bought ones, choosing origami paper with your favorite patterns or colors adds originality and better conveys your feelings to the recipient.
While the folding method is simple, certain techniques are important to achieve a beautiful finish. This article provides clear instructions on how to make a simple Pochi bag from one sheet of origami paper, and explains key points for beautiful results and arrangement ideas.
Table of Contents
Introduction to Making a Pochi Bag (Mini Envelope) from One Sheet of Origami Paper

We’ll introduce a “tuck-in style” Pochi bag (mini envelope) that can be completed from a single sheet of origami paper without using glue or scissors. By carefully aligning the fold lines, you’ll create a practical small envelope. It has a wide range of uses including New Year’s money, message cards, and wrapping small treats, and you can create seasonal atmosphere through pattern selection.
First, let’s grasp the overall picture and learn the necessary materials, basic folding steps, and tips for a beautiful finish.
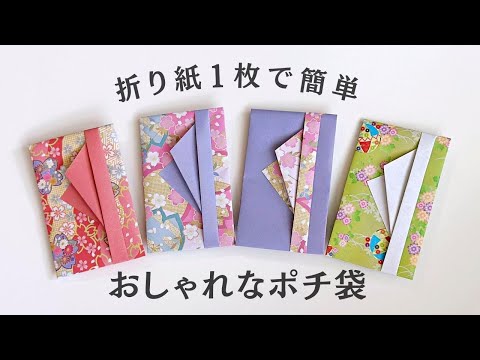
What Kind of Creation?—Size, Uses, and Finished Image
A Pochi bag made from one sheet of origami paper becomes a small envelope about the size of a business card when completed. Using 15×15cm origami paper creates a size perfect for cash cards or mini message cards. The inner pocket naturally formed by the folded structure prevents contents from falling out easily and is convenient for holding small paper pieces or objects. The flap portion has a tuck-in design, allowing easy opening and closing without glue.
The design possibilities are broad—Japanese pattern origami creates an elegant, formal look, while solid colors or Scandinavian patterns result in a casual gift style. By changing the paper size, you can adapt it for “small New Year’s money bags,” “mini envelopes for adding letters,” or “storage bags for stickers and stamps.” Since the structure doesn’t require gluing, it stays thin and remains smart even when bundled for storage. Making many in advance creates a convenient handmade item that can be used for seasonal events or small tokens of appreciation.
What You’ll Need—One Sheet of Origami Paper + Basic Tools That Come in Handy
Basically, one sheet of origami paper is all you need. To create sharp fold lines, lightly tracing with the “edge” of a ruler or card tightens up the finish. 15cm square paper is easiest to handle, and using washi paper texture or single-sided patterned paper enhances the appearance when the flap is folded over.
Glue or tape is generally unnecessary, but for long-term storage or when contents are thick, adding a “spot seal” to the flap’s tuck-in portion provides stability. Having round stickers, string, or stamps for finishing touches allows you to quickly arrange decorations matching the season or event.
Creation Process—Triangle Reference → Pocket Formation → Flap Adjustment (Tips to Avoid Mistakes)
First, create a center reference with a “triangle fold” along the diagonal, then open and fold up the bottom edge to align with the reference line. Next, bring the left and right corners toward the center line, tuck the bottom triangle inside to form the “pocket.” Finally, fold down the top flap and fine-tune the width of the tuck-in opening to complete.
The key point is “always align corners at each step and firmly press the fold lines.” Thick paper or foil paper can crack easily, so follow the order of marking creases → folding gently. When changing sizes, remember that approximately “0.6-0.65 times one side of the original paper” serves as a guideline for storage items, which makes the process smoother.
Tips for Beautiful Finishing and Arrangement Ideas
Here, we’ll introduce points for folding techniques to shape the form, how to select patterns and colors that enhance the design, and arrangement methods matching seasons and purposes. Use these as hints that can be applied in various scenes including homes, childcare settings, and gift wrapping.
Basic Techniques for Aligning Folds (Folding Order and Corner Alignment)
The greatest tip for achieving a beautiful Pochi bag is “aligning fold lines accurately.” When you firmly establish the center line with the initial triangle fold, the later tuck-in becomes less prone to shifting.
When folding, rather than pressing hard all at once, follow the order of “fold lightly to confirm position → press again” to create creases, which prevents paper from cracking and produces a beautiful finish. Especially when aligning left and right corners, using fingertips or card edges to tighten the fold lines increases accuracy.
Also, lightly pressing the entire piece at the end to release air helps stabilize the shape. The care taken with fold lines directly translates to the quality of the finished work.
Choosing Paper and Patterns (Materials and Colors That Change the Atmosphere)
The choice of paper material and pattern greatly influences the impression of the Pochi bag. Using washi-style origami or gold leaf patterns creates an elegant, formal impression, while selecting Scandinavian patterns or pastel colors creates a soft, friendly atmosphere.
Even just stamping on plain paper or drawing borders with a pen instantly adds personality. For New Year’s money, combinations of red, gold, and white are popular, while for birthdays or messages, light colors like pink, light blue, and mint are favorites.
Changing colors according to the season is also recommended—spring with cherry blossom patterns, summer with goldfish or wave designs, autumn with autumn leaves or animals, and winter with snowflakes or traditional Japanese patterns creates seasonal atmosphere. Softer paper texture is easier to fold, but using thick craft paper also creates a sense of luxury.
Enjoying Arrangement Designs (Seals, Tags, Decorations)
Once you’ve mastered the basic form, try the “fun of decorating” Pochi bags. Simply attaching a sticker to the seal portion adds splendor and creates an event feeling.
Using gold or round stickers creates a New Year’s money bag style, while tying with hemp string or ribbon quickly transforms it into a gift style. Attaching small origami decorations (hearts, stars, daruma dolls, flowers, etc.) to the flap is also recommended. Also, if you want to write a recipient’s name, securing name space before folding the flap keeps the layout organized.
Taking advantage of the tuck-in structure, inserting a mini card or stickers inside allows arrangement as a “message envelope.” At kindergartens or school events, having children freely decorate to create “one-of-a-kind Pochi bag exhibitions” becomes an enjoyable activity. Though a small creation, the charm of origami Pochi bags is that ingenuity can balance both personality and practicality.
Application Ideas and Advanced Arrangements
Origami Pochi bags aren’t just for putting money or small items inside—depending on ideas, they can develop into various uses. Precisely because of their small size, they’re versatile crafts usable in many scenes including gifts, messages, and event production.
Also, by slightly changing the shape or folding method, you can enjoy them as three-dimensional packages or “series works.” Here, we’ll introduce three application methods and advanced arrangements that combine practicality with playfulness.
Using as Small Gift Envelopes (Sweets, Messages, Accessories)

Using plain origami paper prevents contents from showing through, while choosing patterned paper increases the excitement of the opening moment. Sealing the flap portion with a sticker or hemp string quickly transforms it into natural gift wrapping. At schools or kindergartens during farewell parties or birthday celebrations, they work well as mini gifts conveying feelings of “thank you” or “great job.”
Also, changing the paper size according to contents expands the range of uses. They’re also popular arrangements as “fortune-style” messages or “surprise envelopes.”
Applications for Events and Seasonal Occasions (New Year’s Money, Halloween, Christmas)
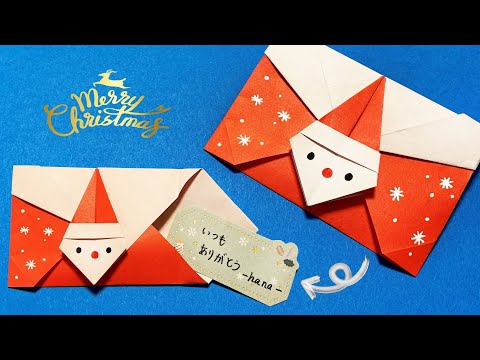
For Setsubun, draw oni or bean motifs, for spring decorate with cherry blossoms or butterflies—you can enjoy decorations for each theme. For Halloween, draw jack-o’-lantern faces on black and orange origami for “treat holders,” and for Christmas, create “Santa envelopes” with green and red combinations.
At kindergartens and homes, activities where children create Pochi bags themed around their favorite events become opportunities to learn about seasonal feelings and creativity. Displaying completed works lined up on walls is also enjoyable as seasonal decoration.
Advanced Crafts Combining Multiple Sheets (Mini Books, Calendars, Lottery Draws)
By applying the basic form and connecting multiple Pochi bags, you can develop new crafts. For example, attaching 6-12 sheets together to create a “monthly envelope calendar” allows you to enjoy inserting date cards or small messages.
Also, arranging Pochi bags horizontally and binding them with string creates “letter books” or “mini albums.” For event activities, writing numbers on multiple Pochi bags to create “surprise lottery draws” is also a popular idea.
Simply inserting messages, stickers, or small paper presents creates the joy of opening. At exhibitions, combining bags children made to display as “trees of gratitude” or “yearly memory boards” is also recommended. Through the world of crafts expanding from a single small sheet, you can cultivate both expressive ability and compositional skills.
Educational and Home Applications and Expanding Learning
Origami Pochi bags not only develop manual dexterity but also contain various learning elements including concentration, spatial recognition, and design sense. Within the creation process, by thinking about folding order and being conscious of geometric shapes, logical thinking and creativity are naturally cultivated.
They’re easy to incorporate both at home and in childcare settings, and are recommended as craft teaching materials enjoyable across generations. Here, we’ll introduce educational and home application methods from three perspectives.
As Parent-Child Play at Home (Cooperation, Conversation, Creativity Enhancement)
Pochi bag making is ideal as a craft to enjoy together with parents and children. Because the process is simple, even with age differences, natural division of labor occurs, and deciding roles like “folder” and “decorator” deepens the cooperative experience.
By exchanging conversation during creation like “What pattern do you like?” or “Who should we give it to?”, communication time increases and you can draw out children’s imagination and expressive ability. If completed Pochi bags are used as letter holders or treasure bags, children can feel the “joy of using what they made themselves” in daily life.
Opening “original New Year’s money bag contests” at family events is also recommended. Through parent-child creative experiences, creative dialogue and “time to think with hands” naturally develops.
Creative Activities in Childcare and Educational Settings (Concentration, Sharing, Observation)
Origami Pochi bags are also perfect for craft activities at kindergartens and schools. Because work time is short and steps like folding, decorating, and showing each other are clear, even young children can experience a sense of accomplishment.
Through creation, geometric sense and concentration naturally develop as children “align corners” and “be conscious of left-right symmetry.” In childcare settings, combining with seasonal events (New Year’s, Hinamatsuri, Respect for the Aged Day, etc.) and developing into “gift making” also connects to activities that cultivate consideration for others.
Also, displaying completed works on walls or bulletin boards creates opportunities to recognize each other’s ingenuity. Educationally, it’s a craft teaching material that can balance development of manual dexterity, creativity, and sociability.
Development into Arts and Crafts/Life Skills Classes (Thinking, Expression, Recording)
In elementary school arts and crafts or life skills classes, Pochi bag making can be developed as “expression + observation” material. For example, recording the folding process with photos or drawings to create an “instruction book” can extend reproduction and verbalization skills.
Also, changing sizes and paper quality to conduct comparison experiments like “which paper is easiest to fold” or “which shape stands most beautifully” can develop into exploratory learning. After completion, incorporating presentation activities like “thinking about usage scenes” or “explaining the meaning of designs” is also effective.
By being conscious of the three stages of “thinking, trying, and communicating” rather than stopping at completion, craft transforms into a deep learning project. From origami, a familiar material, you can cultivate children’s logical thinking and creativity.
Storage and Usage Ideas and Tips for Long-Term Enjoyment
Origami Pochi bags can be enjoyed long-term through storage and reuse ideas, not just made once and finished. By storing them beautifully, they can be used for next season’s or event’s needs, and “awareness of cherishing one’s own works” is also cultivated.
Also, utilizing leftover origami or used wrapping paper attracts attention as eco-friendly crafts. Here, we’ll introduce three storage tips for longevity and ideas for repeated use.
Storage Methods to Preserve Folds (Files, Divider Bags, Moisture Prevention)
To keep Pochi bags beautiful long-term, storage that doesn’t disturb “folds” and “shape” is key. Placing finished bags in A5-B5 size clear files or pocket albums prevents fold lines from being disturbed even when stacked.
If you plan to use them later, protecting them from dryness and moisture in zippered bags provides peace of mind. Since paper absorbs moisture and easily warps, avoid storing in direct sunlight or high temperature/humidity locations.
Attaching labels like “Spring,” “Summer,” “Events” to classify each work makes finding them convenient when next needed. Also, storing unused origami together serves as “color matching” reference for next creation sessions. Being able to enjoy like a collection while organizing is also part of the charm of Pochi bag making.
Reuse and Remake Ideas (Planners, Gift Cards, Envelope Art)

Also, inserting cards on the back side transforms them into gift card holders. Adding to birthday presents becomes a thoughtful touch that conveys the giver’s personality. If stains or creases are concerning, opening flat with a cutter and reusing as envelope collage is also recommended.
Cutting out portions to use as accents in other crafts is also stylish. If you reconsider accumulated works as “materials,” creative possibilities expand further.
Enjoying Through Work Exhibitions and Exchange Events (Craft Interaction, Gallery Display)
Displaying or exchanging made Pochi bags to give works a “presentation” venue is also recommended. At home, arranging them on walls or boards to create “seasonal envelope galleries” is also enjoyable as interior decoration.
At kindergartens and schools, developing into “letter exchange meetings” or “gratitude envelope projects” where friends exchange Pochi bags also connects to communication learning. Especially when different age groups interact, cooperative relationships of “teaching younger children” and “learning from older children” naturally emerge.
When displaying, introducing the theme of works and types of paper used with labels creates an impressive craft exhibition. For children, the experience of having someone see works they created becomes great confidence. It’s the moment when craft develops from “learning” to “expression.”
Conclusion
Origami Pochi bags are versatile crafts that are easy to make and highly practical. Once you learn the folding method, they’re useful in various situations including small tokens of appreciation, gifts, New Year’s money, or letter envelopes.
Within the series of folding, decorating, and giving, children learn concentration and carefulness, while for adults it’s enjoyable as “time to put heart into something.” Also, since the atmosphere dramatically changes just by changing paper patterns or colors, they’re perfect for seasonal crafts or event activities.
By displaying or exchanging works, you can cultivate both creativity and communication. The small envelope born from a single sheet of origami paper is not just a craft but one form of expression that “wraps feelings.” As a craft that conveys the creator’s personality and warmth, please try incorporating it both at home and in childcare settings.


")