


Whipped deco is a popular craft that involves piping silicone to create a cream-like texture. Its appeal lies in how easily you can create adorable pieces using only materials from 100-yen stores. Trading card cases and photo cases offer especially wide arrangement possibilities, allowing even children to enjoy creating designs with a high level of completion.
However, it’s important to understand the unique odor of silicone, drying times, and safety points when handling it. This article provides clear explanations of the basic methods that beginners can follow without failure, standards for selecting materials, and precautions for childcare settings and homes, offering detailed guidance so you can confidently take on whipped deco crafting.
Table of Contents
What is Whipped Deco Craft? Points for Enjoying It at Home

Whipped deco craft is a popular craft that lets you enjoy a texture just like real whipped cream, with the appeal of being able to cutely arrange familiar small items like photo frames and keychains. Since it’s easy to tackle at home, it’s gaining attention as a creative activity to enjoy with children.
However, because its appearance resembles food, it’s necessary to be careful about accidental ingestion, and it’s important to know about proper usage and storage methods. After completion, it has a wide range of uses, from displaying to giving as gifts, and it’s also perfect for seasonal crafts. Here we introduce points for enjoying it safely and examples of home uses.
It Looks Like Cream but Is Not Food (Caution About Accidental Ingestion)
The materials used in whipped deco look exactly like cream, but they’re actually craft materials such as “silicone” and “polyurethane foam,” not food items. Therefore, sufficient caution is needed to prevent small children from putting them in their mouths.
In particular, during the creation process, the soft, cream-like state makes it look sweet and easy to misunderstand, which is a concern. It’s essential for an adult to always supervise during work and to arrange the environment so that infants and toddlers cannot touch it. Also, since it remains as a hard material even after drying, it’s safe to store completed pieces in high places to prevent children from putting broken pieces in their mouths.
If hands get dirty, wash them thoroughly, and develop the habit of putting away used tools rather than leaving them lying around, which contributes to safety. Precisely because visual enjoyment is the charm of this craft, it’s important to clearly tell children beforehand that “this is not food.”
How to Protect and Cutely Arrange Photos and Cards
The charm of whipped deco craft is that it can transform everyday items into “cute, special pieces.” When decorating photo frames or card cases, first use protective film to prevent the material from sticking directly to photos or cards.
Next, pipe the whipped material from the tip of a piping bag and squeeze cream along the edges to create a three-dimensional finish. Adding parts or beads before drying increases the vibrancy and allows for themed arrangements.
To make it resistant to water droplets and dirt, applying a thin layer of clear coating after completion helps it last longer and provides peace of mind in terms of safety. Choosing your favorite colors and motifs brings out individuality and creates pieces that are delightful to display. By consulting with parents and children about decorations, communication naturally deepens during creation.
Turning Items Into Practical Items for Research Projects and Gifts
Whipped deco craft’s appeal lies not only in visual enjoyment but also in the practicality of “creating usable pieces.” Decorating items used in daily life such as pen holders, photo frames, and memo stands makes them ideal for research projects.
Recording the creative techniques and changes before and after drying makes it easy to compile as research and present. Also, completed pieces are appreciated as gifts for birthdays and seasonal events, and choosing colors and motifs according to the recipient’s preferences increases originality.
The experience of children giving something they made themselves contributes to a sense of achievement and self-esteem. Since the materials are relatively durable, they’re easy to display for a long time, making this an accessible craft for homes.
Materials and Purchase Guidelines (100-Yen Stores and Home Centers)
The materials needed for whipped deco craft are mostly easily obtainable, with the major appeal being that you can get everything at 100-yen stores and home centers. Silicone sealant, which is the main material, comes in many varieties, and since the finish changes depending on color and texture, choosing according to purpose makes creation smoother.
Decorative parts and accessories are also inexpensive and varied, so children can choose according to their favorite themes. Organizing supplies leads to preventing mess during work and creating an environment for safe enjoyment. Here we introduce guidelines for selecting materials and where to purchase them.
Confirming Main Materials: Types and Selection of Silicone Sealant

Silicone sealant, which becomes the “cream part” of whipped deco, is an important material that determines the finish. At 100-yen stores you can get small-capacity types, while home centers offer a wide variety of silicone, with options like colored, white, and transparent types that you can choose according to purpose.
White is easy to use for cake-style designs, while transparent types are suited for finishes that showcase beads. Choosing products “without anti-mold agents” when possible provides peace of mind for crafts that children handle. Types with thin nozzles are easy to handle and can be piped like cream, making them recommended for beginners.
When using large amounts, the large-capacity types at home centers offer superior cost performance. Checking drying time at purchase makes it easier to plan work and provides peace of mind when handling after completion.
Selecting Decorative Parts (Ribbons, Hearts, Beads, etc.)
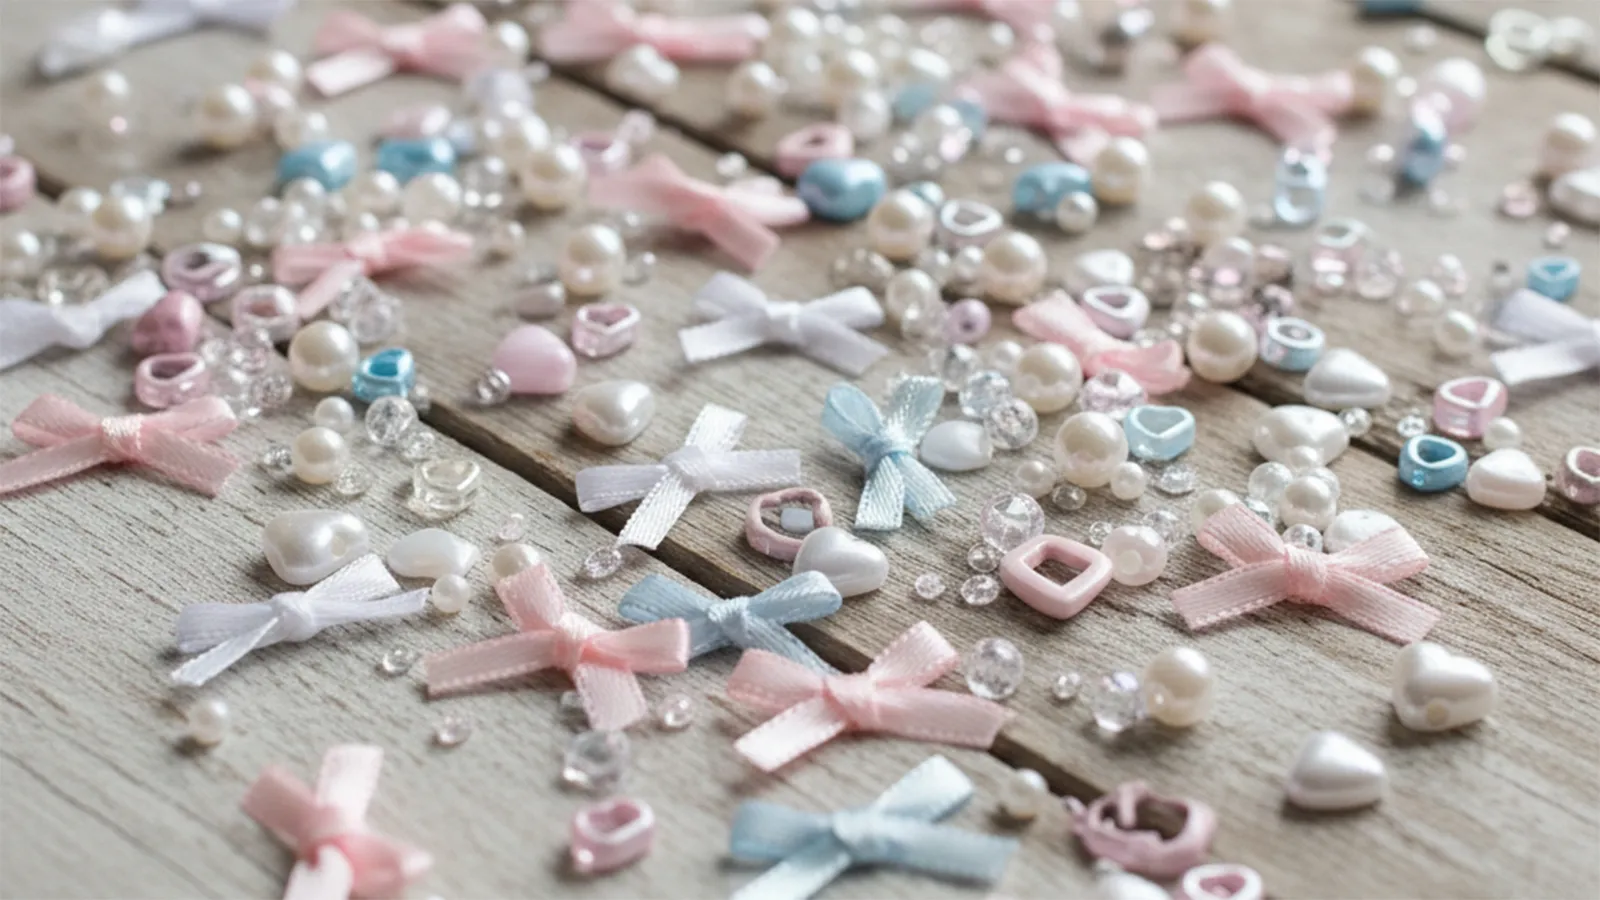
What brings out the charm of whipped deco is decorative parts like ribbons, hearts, and beads. At 100-yen stores, there are many seasonal decorative items, and being able to choose according to themes stimulates children’s creative motivation.

Lightweight resin parts are easy to handle, with the characteristic of being easily fixed just by lightly pressing them into the whipped material. Beads come in many varieties including transparent, pearl, and colorful types, with impressions changing greatly depending on arrangement.
Heart and star-shaped parts become accents and make the overall piece more vibrant. Large parts have impact but have weight, so careful placement provides stability. To prevent accidental ingestion, when creating with young children, pay attention to part sizes and have adults sort and hand them out for safe work.
Supplies: Work Mat, Newspaper, Apron, Wet Wipes
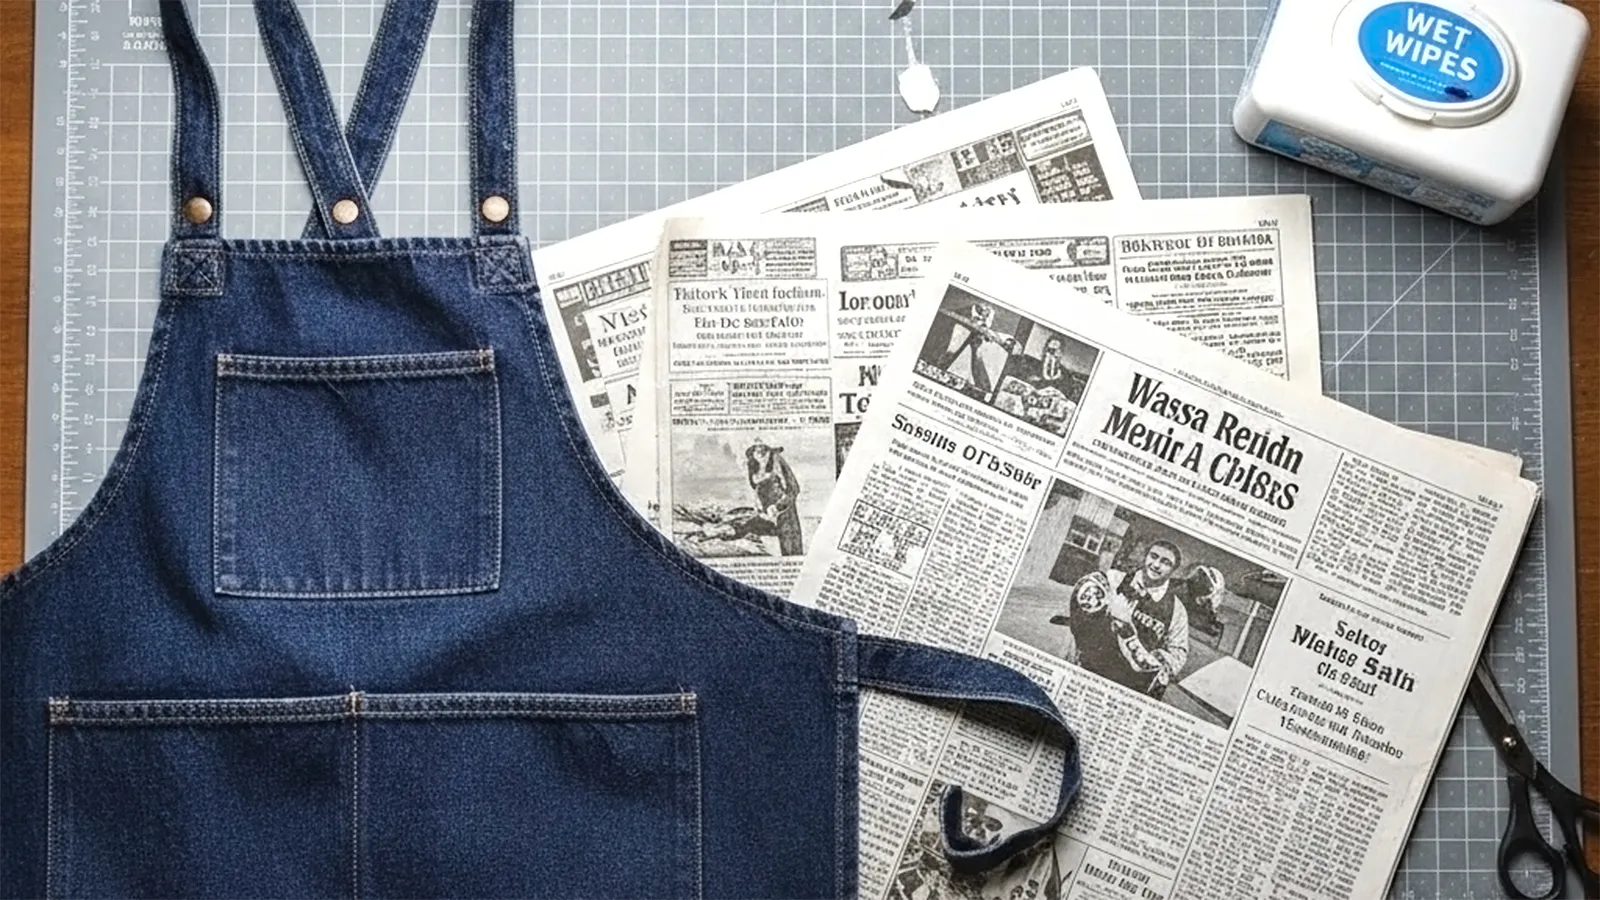
Since whipped deco involves handling silicone, organizing the work environment allows you to enjoy creation with peace of mind. First, laying down a work mat or newspaper to protect the desk prevents mess from spreading and makes cleanup simple.
Having children wear aprons prevents clothing stains and makes it easier to concentrate on work. Preparing wet wipes so you can immediately wipe when silicone gets on hands is convenient.
Also, using small dishes or trays to prevent parts from rolling makes organization easier and creation smoother. Since works before drying lose their shape when touched, securing a storage location is also important. Organizing supplies increases safety and creates safe, enjoyable craft time for parents and children.
Home Rules for Proceeding Safely
While whipped deco craft is cute and fun to look at, safety measures at home are very important because it involves handling silicone materials. Securing a work area beforehand, ventilating, and devising ways to prevent adhesion to skin and eyes creates an environment where both children and adults can work with peace of mind.
Also, organizing clothing and tool preparation makes cleanup easier and stabilizes the finish of pieces. Having an adult supervise while proceeding within a reasonable range leads to safe craft time. Here we introduce basic safety rules that are easy to incorporate at home.
Ventilation and Securing Work Area (Consideration for Odor and Drying Time)
Since silicone sealant can produce a slight odor during work, proceeding with ventilation is the first step to safety. Opening windows or using a circulator circulates air, allowing children to work without worrying about odor.
Also, using a wide desk or floor and laying newspaper or mats to properly secure work space is important. Drying time varies by product and can take several hours to half a day.
Since touching during drying causes shape collapse, deciding on a safe space to place pieces beforehand provides peace of mind. Placing in locations out of reach of small children and pets allows safe preservation until after drying. Securing two locations—a work area and a drying area—makes creation proceed smoothly.
Thorough Use of Gloves, Clothing That Can Get Dirty, and Skin Protection
Since hands get dirty easily with whipped deco, wearing gloves allows you to work with peace of mind. Especially since silicone becomes sticky when it adheres to skin, preparing thin vinyl gloves or disposable gloves is convenient.
Also, having children wear clothes that can get dirty or aprons allows them to work without worry and creates an environment where they can concentrate. For children with sensitive skin, avoiding rolling up sleeves too much and applying moisturizing cream beforehand can reduce irritation if adhesion occurs.
Communicating simple rules beforehand such as “clothes can get dirty” and “always wear gloves” raises safety awareness and makes it easier for adults to provide support. Organizing clothing makes post-work cleanup smoother.
Prevention of Adhesion to Eyes, Mouth, and Skin and Points for Supervision
Since it’s dangerous if silicone material gets in eyes or mouth, adult supervision is essential during crafting. Especially because it looks like cream, small children may think “I want to touch it” or “I want to taste it.”
Firmly communicating that “this is not food” before taking out materials and reminding them not to rub their eyes during work provides peace of mind. If it adheres to hands, don’t rub forcefully but wipe with wet wipes and then wash off with soap.
If it gets in eyes or mouth, immediately rinse with water and consult medical facilities as needed. Since pieces and tools before drying lose shape easily when touched, considering placement so children don’t accidentally touch them is also important. Having an adult supervise the situation while proceeding increases safety and creates craft time that can be enjoyed with peace of mind.
Color Basics (Mixing and Handling Glitter)
Coloring in whipped deco is an important process that determines the atmosphere of the piece. Since colors are created by mixing paint into silicone, adjusting amounts and color mixing requires adult support.
Even slightly changing colors greatly changes impressions, and there’s the enjoyment of children being able to create their own original colors. Furthermore, adding glitter or pearl increases vibrancy and adds sparkle to pieces.
However, since powdered materials scatter easily, ingenuity in handling methods is necessary. Here we introduce the basics of coloring, including mixing methods and how to use glitter.
Portion Management in Cups and Processes Requiring Adult Support
When coloring silicone, it’s important to manage portions using small cups. First, take an appropriate amount of silicone and gradually add paint while mixing.
Adding too much paint changes the hardness and makes it difficult to achieve the three-dimensional quality of whipped material, so the basic approach is to add very small amounts at a time. When mixing, use a spoon or disposable chopsticks and mix slowly until uniform. The coloring process requires strength adjustment, and there are concerns about container tipping and hand soiling, so proceeding with adult supervision nearby provides peace of mind.
Especially with infants and toddlers, there’s the possibility of accidentally touching or putting paint or silicone in their mouths, so attention to material placement is also necessary. Dividing portions into small amounts makes it easier to create color variations and work proceeds smoothly.
How to Mix Paint and Color Guidelines (Mixing Samples)

The biggest tip for creating colors is “mix little by little.” Adding paint to white silicone produces soft color development, finishing in adorable pastel tones. Mixing blue and white creates pale light blue, red and white makes pink, and gradually mixing yellow and blue in small amounts creates bright emerald color—showing mixing examples helps children visualize.
Adding more paint makes colors darker, but it also softens the silicone, making it harder to maintain shape, so it’s important to mix while finding the right amount. Doing test applications on paper beforehand makes finishes easier to predict and reduces failures.
When making multiple colors, separating tools by cup prevents mixing and makes work smooth. The time parents and children spend thinking about color combinations becomes an enjoyable moment that nurtures creativity.
Appropriate Amounts of Glitter and Pearl and Ideas for Preventing Scattering
Adding glitter or pearl creates sparkle in pieces and brings out the distinctive vibrancy of whipped deco. However, too much makes it difficult to adhere to the silicone surface and may fall off after drying, so the basic approach is to lightly sprinkle about a pinch.
Since it’s a material that scatters easily, transferring to a small container and lightly pinching with fingertips or placing small amounts at a time with the tip of a spoon makes it easier to handle. Laying down a work mat simplifies cleanup and prevents spreading to surroundings.
When using pearl beads, lightly pressing them into the soft silicone before drying provides firm fixing and creates a three-dimensional finish. Since small parts can lead to accidental ingestion, when creating with young children, it’s important for adults to carefully manage them and proceed while ensuring safety.
Practice Before the Real Thing and Decoration Methods for Cases
Whipped deco requires hand sensation more than appearance suggests, and “practice time” before starting to pipe determines the finish. Decorating cases immediately makes failure likely, so first confirming strength adjustment and line thickness on paper provides peace of mind.
In the actual work, mastering basic patterns like edging and frills brings the overall piece together and improves appearance. Even if you fail, you can adjust before it hardens, so calmly addressing issues leads to a beautiful finish. Here we introduce practice methods and case decoration procedures that are practical even at home.
Test Piping on Practice Paper and Confirming Strength Adjustment
Since the impression of whipped deco changes greatly with how cream is applied, it’s important to first do test piping on practice paper. Lightly pipe onto paper and check whether lines are too thin or too thick.
If pushing force is too strong, it piles up too much and takes time to dry, while if too weak, lines become broken, so practicing to pipe with constant force creates a stable finish. Also, trying basic movements like curves and zigzags beforehand reduces hesitation during the actual work.
Just changing the angle of the piping tip changes line shapes, so moving in multiple directions to grasp the sensation is also recommended. Regular paper or copy paper is sufficient for practice paper, but since it may stick to paper after drying, laying laminating sheets or kitchen paper makes handling easier.
Basic Patterns That Look Good Like Edging and Frills

If you want to improve the appearance of case decoration, remembering “edging” and “frills” makes the finish much more vibrant. Edging is a method of piping thinly and uniformly along the outer perimeter of the case and is a versatile technique applicable to any items like photo frames or accessory cases.
Frills are three-dimensional lines created by moving the piping tip up and down in small increments, expressing a cake-like cuteness. Furthermore, placing beads or parts on piped lines creates accents and increases originality.
Layering patterns increases vibrancy, but piling too much takes time to dry, so arranging while viewing overall balance creates a neat impression. Performing basic movements slowly and carefully is the shortcut to beautiful finishes.
How to Redo: Wiping and Adjusting Before Hardening
Whipped deco offers great peace of mind in that you can redo before it hardens. If lines collapse or you make amount mistakes, gently wipe off using cotton swabs or spatulas before drying.
Rubbing forcefully with tissue causes spreading, so the point is to lightly press to remove. After wiping, cleaning the thin film remaining on the case with wet wipes returns it to a clean base.
If you can’t completely remove it, there’s also the method of covering by layering new lines on top. Once drying begins, silicone becomes rubber-like and shapes become difficult to fix, so it’s important to make corrections as early as possible. By responding calmly even when feeling you’ve failed, you can maintain a beautiful finish.
Summary
Whipped deco craft has the charm of materials being easily obtainable and accessible even for children to try, while depending on ingenuity in coloring and piping techniques, it can achieve authentic finishes. By organizing preparations with consideration for safety, you can tackle it with peace of mind even at home.
Practicing beforehand to confirm strength adjustment and mastering basic patterns greatly increases completion level. Since redoing is possible before hardening, the point of being able to enjoy finishing time while consulting with parents and children is also a major appeal. Whipped deco, which is easy to apply to everyday items and gifts, is recommended for homes as an enjoyable craft that expands creative possibilities.


")